Herbs need a well drained, fertile soil to do their best. Prepare the soil as you would for a vegetable garden. Remove weeds, cultivate, and add organic material or fertilizer to your garden. Most herbs need a sunny location – If you do not have a bright spot, try planting them into patio pots – an advantage to this is that the pots can be brought inside in the fall. You can also place them close to your door for easy access while cooking your favourite dishes. Don’t plant your herbs outside until all the risk of frost has past. Dig a hole slightly bigger then the pot and scratch the root ball to loosen the roots. Place the plant in the hole and water thoroughly with a transplant fertilizer, as this promotes good root growth.
Harvest and Storage
Herbs can be harvested at any time through the summer months as long as you leave at least one third of the growth behind. When cooking with herbs – the general rule is to use twice as much fresh as dried. If storing herbs for winter, the best time to harvest them is just before they flower – This is when their oil content is highest and peak flavour is reached.
Although there are some perennial herbs, many of the herbs that grow here must be treated as annuals. Some of the herbs can be brought indoors in the fall. Dig up the herb and plant in a pot. Use soil-less planting mix and spray for insects. Once inside, place the herbs where they can get six hours of light each day. Fertilize with each watering and only water once the soil is dry.
Drying Herbs
The traditional way to preserve herbs is to cut their stems and hang them in bunches to dry upside down, here are some other ways that your herbs can be dried:
Wash lightly and hang upside down in a brown paper bag (save your wine bottle bags!) – hanging upside down causes the essential oils to flow from the stems to the leaves where you want them
Wash lightly, place on a cookie sheet (not more then 1″ deep) and dry in 180 degree oven for 2-4 hours
Wash lightly, place on paper towels or a paper plate and microwave for 1-3 minutes, stirring every 30 seconds
Wash lightly, blot dry, then place in a shallow pan of non-oxidized salt – this will take 2-3 weeks
Wash lightly, place on a cookie sheet and dry in the sun for a week or so
When the herbs are dry store them in an air tight container. It is best to dry the herbs whole and then crush when using for the maximum flavour
Freezing Herbs
Chop the herbs and place them into ice cube trays, fill with water or olive oil/canola oil and freeze. Put those frozen cubes into freezer bags and they are ready to go when your cooking!
Another way is to place the whole leaves and stems in freezer bags – this way will result in freezer burn faster then if they were in oil or water
Our Favourite Herbs
Parsley
There are three types of parsley: Curled, Plain and Italian. Parsley is easy to grow and can be grown indoors or out. Use the leaves as fresh or dried in all cooking.
Dill
No garden is truly complete without dill. Leaves and flower heads are used in pickles, but also tastes great with new potatoes or carrots, in salads or on fish.
Chives
Chives are also easy to grow. It is easiest to harvest by cutting with scissors. Chives add flavour to soups, salad, egg and cheese dishes.
Thyme
Cooking thyme is best treated as an annual. Thyme needs a lot of sun, and is very easy to dry. Used best in meat dishes or teas.
Mint
There are many different kinds of mint, each having a different flavour. Curled – mild mint with attractive light green curled leaves. Spearmint – Best cooking mint. Excellent with carrots, peas, potatoes, and in mint sauces. Peppermint – Favourite for teas
Oregano
This herb is very attractive when flowering. Used best in tomato sauces and other Italian recipies.
Sage
Most often used in stuffing.
Cilantro
Fresh leaves are essential in Chinese and Mexican dishes. Seeds are used to flavour soups, chili and sauces.
Rosemary
Rosemary is a very popular herb that can be used in various ways. Fresh leaves are appealing in biscuits, dumplings, and poultry stuffing. It can also be used in making shampoos and facial rinses.
Marjoram
Flowers of marjoram attract honey bees and is popularly used to treat upset stomach and headaches.
Basil
Sweet basil is the most popular herb, its used in flavouring most foods.
Tarragon
It’s flavour is suggestive of anise or licorice. It can be added to various dishes including omelettes, poultry, and hollandaise sauce.
Hot Peppers
Used in many Mexican or Chinese foods to give that punch of flavour. Some varieties include Hungarian wax, Jalapeno and Cayenne.
Garlic
Plant this bulb in fall or very early spring. Garlic can be used to flavour a variety of foods and is commonly used in Mexican, Chinese and Greek dishes.
Orchids are a beautiful, rewarding exotic flower to have in your home.
There are many types of Orchids – up to 20 different species!
The most common being Phalaenopsis, known as Moth Orchids – due to their shape resembling a moth in flight. If you have a Phalaenopsis Orchid and it starts sprouting leaves instead of a flowers at the end of its spike – You have a very special orchid! Your orchid is growing a baby and once that baby has 2 or 3 roots and those roots are 3 to 4 inches you can cut it from the stalk and plant it to create a new orchid
Phalaenopsis Orchid
The Brassia Orchid blooms have elongated petals which gives them a spidery appearance. They are typically yellow or green with brown or maroon striping or spots.
Brassia Orchid
And the Paphiopedilum Orchids are a genus of the subfamily Cypripedioideae, commonly referred to as the Lady’s or Venus’ Slipper Orchids, named for the unusual shape of the pouch of the flower, said to resemble a lady’s slipper.
The first point to know about growing Orchids is – it’s EASY!
Choose the right orchid for you, place it in a well lit environment – but not in direct sunlight.
Watering your plant is important, do make sure not to over water or to let it stand in water. Adding a few (2 or 3) ice cubes once a week works really well – but a good thorough watering twice a month and fertilizing once a month will give your plant the added nutrients it craves! Most Orchids are planted in a well draining medium so water will run out the bottom. The best way that you can give your plant a thorough watering is to place the pot (with drainage) or take the plastic liner out of a decorative pot – and put it in the sink, watering until it drains out the bottom. Let the Orchid drain out until no water is running out the drainage holes and return it to its spot! A sure sign to know if your watering correctly is to look for the Orchid’s air roots, if these are dry and shriveling – it needs more water – if they look plump and healthy – then your doing it right!
Many people don’t know what they are supposed to do after an Orchid finishes blooming. There are two steps to take * Find a triangular node under the lowest flower bloom and trim 1″ above that node. This will cause your Orchid to send off a new shoot and bloom again in about 6 months. OR * If your spike is brown and/or yellow trim the spike back to the base of the plant. Your orchid will have to now grow back a new healthy green spike. This could take up to 8-12 months. REMEMBER: Your Orchid goes through a resting period after blooming and an Orchid will only bloom once a year.
Only transplant your orchid if you think that it has out grown it’s pot. Orchids have air roots – which usually look like regular roots escaping the pot – this is NORMAL! If you do transplant, make sure to use an Orchid medium. We at Oakridge can help you to choose the right medium for your plant.
These are a few easy tips to growing a beautiful healthy Orchid!
If you have any questions, feel free to stop by Oakridge and we would love to help you with your Orchid or Tropical Houseplant related issues!
Have you looked over at your neighbour’s lawn and thought “Why is their grass so much greener and thicker”? Don’t worry, you are not alone. Most of us want that beautiful, thick, green lawn and it isn’t as hard as you think to achieve it.
We all know that vegetables and trees require water and nutrients to survive and thrive. Grass is no different. Today I want to focus on the fertilizer and weed control. Look back at the mowing height blog and watering habits (coming at a later time).
Let’s start with weed control. It doesn’t matter how hard you try, how much weed control you put down, you need to come to terms with the fact that weeds will appear in your lawn at some point. What we are trying to do is limit how many weeds do emerge early in Spring so we can thicken up the lawn to choke them out. Since the provincial ban on pesticides has come into effect, there are very few pesticides allowed for use. Fiesta is one of those approved and in use by most companies. It is an iron based liquid and is applied directly to the weeds and not broadcast over the entire lawn. It is safe for pets and children which will give you peace of mind. While Fiesta is effective, for best results applying multiple times is required to ensure weeds are knocked out. Combining this with a good fertilizer program will help eliminate most weeds.
Now let’s discuss fertilizer. Just like people, lawns need energy. This is where fertilizers come in. There are many types of fertilizers and we are all familiar with the 3 numbers on the bag or bottle. We know these numbers are important but what do they mean?
Let’s start with the first number. This represents Nitrogen (N). Nitrogen is associated with growth. This will make your grass grow taller, thicker and greener. Generally, we choose a higher Nitrogen number in Spring and Summer but want it to be lower in Fall as we want the grass to stop growing before winter. The second number is Phosphorous (P). Phosphorous is generally associated with blooming. In grasses, we normally do not choose a fertilizer with any Phosphorous in it. The exception is when we are seeding to help promote root growth. The final number represents Potassium (K). Potassium is linked to disease resistance, cold tolerance and also aids in root development. Just as we choose a high Nitrogen number in Spring and Fall, we like to choose a higher Potassium number in Fall. This will help your lawn prepare for winter. So now we know what the numbers are but what are the actual numbers? These are percentages of each ingredient in the bag or bottle. A fertilizer that is 30-0-10 has 30% Nitrogen, 0% Phosphorous and 10% Potassium. (A great fertilizer for Spring and Summer by the way!) Wait a minute that only adds up to 40%? What the… Don’t worry the rest of the bag is filled with a filler. In this case 60%. Filler can be a combination of other nutrients and/or products to help your lawn take up the nutrients better and more efficiently. Finally, fertilizers come in a quick release format or a slow release. Slow release has now become the normal procedure. These fertilizers are applied at longer intervals as the nutrients are released slowly and evenly over a long period of time. This helps give your lawn the nutrients and food it requires in small doses. Quick release fertilizers release almost all the nutrients at once. These fertilizers must be watered in to prevent burning your lawn. By feeding your lawn regularly, you are creating a thick, lush lawn. This lawn will increase its root growth as well. By increasing root growth, there is less room for weeds to develop.
Oakridge offers different types of fertilizer and weed control programs to meet your needs. Our goal is to provide you with that picturesque, lush, green lawn that will make your neighbours envious and they will be the ones asking the question.
The snow has melted, the weather is starting to warm up and we are getting excited because we can get outside and start working on our lawn again. We go outside and as we walk on to the lawn we see our grass has these round white and yellow patches everywhere. What is that?! Oh no! It’s SNOW MOLD!!! Ewwwwww! Don’t fret. I am here to tell you it isn’t as big a deal as you might think. There are some practices to help tackle this issue right now and to make it better in the future.
What is Snow Mold? Snow Mold is a common fungal disease that affects most types of grasses. The 2 most common types are gray snow mold and pink snow mold. They will appear as patchy spots on your grass that is matted down and web-like. The spores will often remain dormant during the season and then become active under a blanket of snow in Spring as the snow is melting. The more snow cover there is, the more chances of snow mold conditions. One of the most common ways to deal with Snow Mold, if you have it, is to rake it out in Spring then follow that up with a Spring Fertilizer to promote new grass growth. If the patches are larger and leave a dead spot on your lawn, you can throw down some soil and seed to help grow in the patch. Now that you have removed the problem, the next steps are to develop a strong lawn that will not be as susceptible to Snow Molds.
The main keys are to:
Water our lawns at least weekly (1 inch a week),
Mow at the proper height (2 ½ inches to 3 inches is perfect),
And fertilize throughout the growing season.
I recommend starting with a Spring fertilizer in May (I like to use a quicker release to promote growth right away). Follow that up with a Summer fertilizer in June (a slow release is great). Another Summer fertilizer again in late July (use the same one as in June) and put down a Fall fertilizer in September. The Fall fertilizer will help to create a strong root system and be more disease tolerant.
Finally, as the season is winding down, begin to lower your mowing height. Just one notch per week sometime in September (depends on the season and temperatures). Do not go lower than 2 inches though. The last step that will help to prevent Snow Molds is to rake up leaves on the grass before the snow flies. If the leaves were left on the grass, they create another layer for moisture to get trapped and this can create an ideal situation for Snow Molds.
There you have it. See? I told you it wasn’t so bad. Just some good lawn practices and you should be able to keep the snow molds to a minimum. With our winters and the amount of snow we can receive, it is hard to never have Snow Molds but we can limit it and deal with it properly in the Spring and Summer.
We offer many services here at Oakridge to help you achieve and maintain a healthy lawn. Call us now to book your Spring Cleanup and Lawn care packages for Fertilizer and Weed Control. We also offer weekly mowing programs.
Cold weather has us down! For those (like us) who are anxious for planting season to start – we have the solution! Indoor growing sprouts!
Brand new to us here at Oakridge is the Sprouting Seeds from the fabulous West Coast Seeds!
A British Colombia based company who are certified handler of organic seeds, they offer “800 varieties of untreated, non GMO, non GEO, open pollinated and hybrid seeds”.
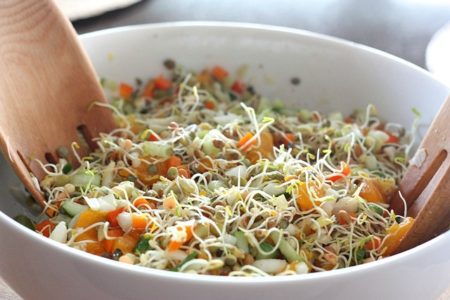
Sprouting Seeds offer you the freedom to grow fresh and organic sprouts fast and easy and at any time of the year! West Coast Seeds promote sprouts as “easily digested, and they contain concentrated amounts of vitamins, minerals, protein, and amino acids. In short, newly sprouted plants are about the most nutritious food available”. According to healthycanadians.gc.ca “While sprouts are a healthy food option, they can sometimes be contaminated with harmful bacteria such as E. coli and Salmonella which can lead to food poisoning” this can happen “in the farm environment, during packaging, storage and transportation” So growing your own can become a huge benefit in adding sprouts to your diet, WITHOUT any of the worry!
Find recipes to incorporate sprouts into daily meals!
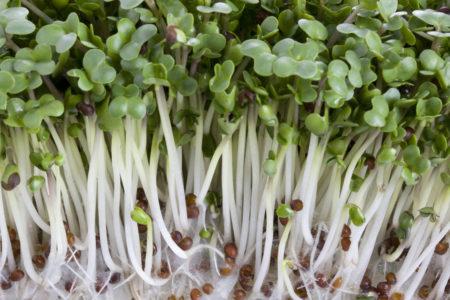
When starting your sprout growing journey we have a variety of options to choose from : Alfalfa, Mung Bean, Fenugreek, Broccoli, Clover, Yellow Mustard, Green Peas, Red Radish, Red Hard Wheat, Salad Mix, Go-Go mix and a Gourmet Mix – something for everyone!
After choosing your seeds – its time to start sprouting. The process is simple: Soak, drain and rinse 3 times a day! In a few days you will have sprouts ready for enjoying – wasn’t that easy!
What do the numbers on fertilizers mean and how do they work for your plants?
NPK – Nitrogen, Phosphorus and Potassium
Whether you have Inorganic or Organic fertilizer the 3 sets of numbers give the same nutrients to your plants.
When you have an All Purpose 20-20-20 Inorganic Fertilizer, the first number represents 20% Nitrogen which helps with the top growth of the plant, promotes lush green growth and is a good choice for leafy vegetables. The second number is 20% Phosphorus which helps with the roots of the plant, making them strong and healthy. Phosphorus also helps with blooming and is necessary for fruit and flower development. Blooming plants like tomatoes, peppers and other ornamentals benefit from higher phosphorus especially when they are ready to set buds. The third number is 20% Potassium and is necessary for stem growth and overall plant vigor. Potassium is especially good for root crops such as carrots, potatoes and beets.
Now if you add these percentages together you get 60%, the remaining 40% is salts. This applies to inorganic fertilizer.
For Evolve Organic Fertilizers such as an All Purpose Plant Fertilizer 3-1-2, when you add (NPK) together you get 6%, the remaining 94% is made up of best compost available.
Oakridge carries a wide variety of fertilizers….Organic, Inorganic, liquid, water soluble, dry granular and spikes.
Dry granular fertilizer is great to use in your flower or vegetable garden or among your trees and shrubs . It releases nutrients over a long period of time. In general you want to apply this fertilizer at least once, in mid spring, and possibly two or three more times over the course of the late spring and summer depending on the weather and what the recommendations on the packaging says.
Tree and Shrub Spikes are another way to fertilize. Pushing these spikes into the ground around the drip line of your trees will allow the nutrients to release slowly throughout the season. You may apply these in mid spring then again in mid summer and the instructions on the package will tell you how many spikes to use per tree and how often to reapply.
Liquid or Water Soluble fertilizer is an instant feed. If your flowers, trees, shrubs or vegetable gardens appear to be stressed and are in need of nutrients, these fertilizers may be your best option. Follow the package directions for mixing instructions. It is very important not to mix stronger than it calls for. You will need to apply liquid plant food several times over the course of the growing season, once a week or every 2 weeks is optimal.
Evolve Rage Plus 0-4-0, is an organic fertilizer that can be used throughout the whole growing season. Whether your plant is trying to produce leaves, flower or fruit or develop bigger stronger roots, this fertilizer is the fuel your plant needs! It works really well on plants that are suffering or on plants that look good but you just want to give them a boost. This fertilizer increases the metabolism of your plant by 100 times and will work on all stages of your plant. It’s great for helping plants that have had a hard time throughout our cold, windy winters. A good example are cedars that are brown in the spring. Rage Plus will help your plants in the fall to store up sugars in the root zone for winter survival. It is great for indoor and outdoor plants as well!
Just a snipped about fertilizers, feel free to come and talk to Theresa about fertilizers, it’s her specialty!
Nothing is better than growing your own vegetables or herbs from seeds or young transplants, watching them grow everyday and waiting to harvest. It is a real treat to go out each day and pick fresh lettuce for a salad or potatoes, baked or roasted, you decide. And if you’re thinking, “I don’t have a garden or yard to plant a bountiful veggie or herb garden” then I am here to let you know “you can”, by planting a container garden. Whether you have an apartment, condo, small yard or just want to have some incredible containers on your patio, you can plant many types of vegetables and/or herbs in containers. I (Theresa) have tried alot of different vegetables in containers, such as tomatoes, peppers, cucs, green onions and kohlrabi. I have harvested a bountiful crop from them all. For the first time last year I tried carrots and lettuce, which grew very well. Some great herbs to seed or transplant are basil, parsley, dill, sorrel, thyme, etc. Even if you have ground for growing, containers can help you overcome problems like poorly drained soil, pests and soil-borne diseases. Another great thing about growing in pots is that the soil warms faster so you can sow your seeds earlier and get a head start on your vegetables/herbs. Also with pots being higher, it’s like working in a raised garden bed.
Planting/Seeding…..
Lets get you started……all you need is a generous size container, good potting soil, bone meal and a suitable spot — that gets at least 5 to 6 hours of full sun a day. Fill your containers about 2 to 4 inches from the top of your pot, mix 2 tablespoons of bonemeal per gallon of soil. Bonemeal helps with the development of roots and also helps to prevent blossom end rot on tomatoes, peppers, cucs etc. If you want you can add some Vermicompost (also know as worm casting) with your potting soil. I dampen my soil first then I begin my planting or sowing the seeds. Set your transplants the same level they were growing in their pot except for tomatoes, take some lower leaves off and plant deeper into container. Always make sure you water well after planting. Sow your seeds in the container by following the directions on the package, every variety has different directions. All this info applies to herb gardening as well, whether it’s seeds or transplants.
Watering…..
Watering is the most important thing to watch for in your container garden. Inspect your containers regularly, don’t allow your potting soil to dry out. For best result, keep soil at an even moderate moister. You may have to water every second day depending on the weather and plants that are in the containers.
Fertilizing…..
You can start fertilizing your transplanted vegetables or herbs about one to two weeks after planting. For seedlings, it is best to wait for the first set of true leaves to develop and start with a seedling starter fertilizer. Follow the mixing directions on your organic or water soluble fertilizer. Once your seedling have their 4th to 6th true leaves you can change your fertilizer to an All Purpose or Vegetable fertilizer.
These are the few easy steps and you got yourselves a container garden.
Happy planting to you all and enjoy an awesome gardening season.
Spring has sprung and your yard looks the same as it did before frost. Surely there are many of you out there that are wondering,”How do I get my yard to look like the neighbours?”Preparation will be a key component to moving forward with this. Doing your homework ahead of time can greatly ease the mind when you will want to put shovel to the ground.
Planning ahead with things of importance to you such as decks, gardens, sheds, playstructures etcetera, will make your vision clearer as you realize how much space these items can take up in your space.
Getting a list of favourite trees, perennials and shrubs as must haves would be the next item up on the list. Get yourself a catalogue with pictures and references as to how big everything can become, and you will soon see ideas forming in your mind as to how everything will start to fit into your landscape.
Landscape consultations and designs would be one of your final steps in achieving the yard of your dreams. You can get a simple design which would be called a consultation. This would be where a landscape architect would come to your yard and get your wishlists from you, and from this, do a basic sketch of your yard with flower beds and all buildings and structures. Keep in mind this is very basic and for just a little more you can get a full landscape design. This would include everything from the basic consultation plus accurate measurements and a to scale drawing where you would see on paper what your yard would look like from a top view. Doing this is great for many reasons. You will get a copy of this plan to find out if you want to do it all in one step and be done. Plant listings can also be available and you can look back to remember what you all have planted everywhere. Another bonus would be if you were to do just some parts of it, you would always have this reference later to remind you exactly where you would continue for your next step.
Call us today to set up your landscape design from Oakridge!
Many of us are left wondering… What do I do with shady area in my landscape?
The answer is, that there are many great perennials that flourish in part to full shade.
One of my many favourites are the newer varieties of dicentra (bleeding heart). Unlike some of the older fern leaf varieties they are much easier to grow. Dicentra Valentine is great with it’s larger red and white flowers on a background of lush green foliage. Or, for a bit more contrast, try Gold Heart dicentra. It has bright pink and white flowers on a backdrop of golden leaves.
Another great option to add some colour to those shady spots is astilbe. These heavy drinkers prefer to grow in part to full shade. Astilbe has large plumes of flowers stemming up from it’s delicate looking foliage. Two of the varieties we have found grow the best are the Younique series, and the japonica varieties, such as Montgomery and Radius. There are also some great new varieties including Colour Flash (white flowers on dark green leaves with red edges), and Color Flash Lime (pink flowers on chartreuse foliage). Chocolate Shogun is a stunner with larger leaves than other astilbe, in a rich chocolate/burgundy colour adorned with pastel pink blooms.
For those of you who prefer foliage that is non-flowering , ferns are a great way to fill in a shady space. The Ostrich fern (matteuccia) is an extremely tough Zone 1 plant. This 46” tall fern has gorgeous bright green fonds, that will sucker and spread to fill in an area with only a few host plants.
As a less invasive option try a Cinnamon fern (osmunda), reaching 40” tall with a broader more exotic looking fond. An American Maidenhair fern is great for the front of your beds. It is much smaller than other types, reaching only 8” high, and has softer lacey looking fonds.
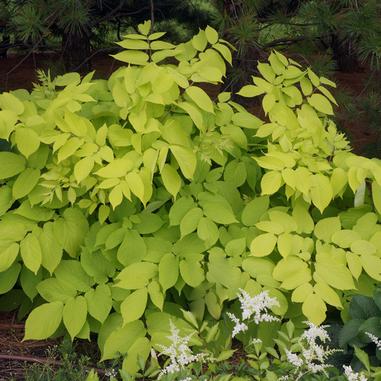
Myself and Erna’s absolute favourite perennial, which is great in sun or shade is ‘Sun King’ Aralia (Japanese Spikenard). It’s a bright, tropical looking, shrub like perennial that grows to 3’ tall and wide. Just an all around awesome plant.
Last but not least, we have the hosta. With so many varieties to chose from, this shade lover comes in a wide variety of shades and sizes. A great new type of hosta to try is ‘Lakeside Paisley Print’, which is great for borders reaching only 10” tall with golden leaves and lime green ruffles edges.
Come and see me in the perennial house for more ideas and advice on all of your gardening needs.