A favourite task for us in the Greenhouse is getting to explore the new plants that have been developed each season. With new colour options and hybrids, some of our all-time favourite annuals are those that have been created in just the last few years.
Before we consider adding a new plant to our Greenhouse, we take special care to ensure they will not only add visual appeal, but also be a strong and healthy addition to our gardens. New plants are exciting, however, they may not always be perfect. Sometimes what can look promising in a trial garden doesn’t translate well into a home garden. We take this into careful consideration when we choose our new favourites for the season so you know you’re getting the best and brightest of the new arrivals.
We’ve scouted out our favourite new plants for 2022 and we’re excited to introduce them to you!
#1 Begonia I’Conia Lemon Berry
Part-Full Shade | Trailing | Basket/Container
This shade loving plant offers large striking blooms with soft yellow centres and shades of pink on the outer petals. Complimented by deep green foliage the Begonia I’Conia Lemon Berry is sure to make a statement in any basket or container.
#2 Petunia Crazytunia
Black and White
Part-Full Sun | Mounding | Basket/Container
With crisp white petals and vivid black centres these Petunias are an absolute knockout.
#3 Calibrachoa
Rainbow Calypso Coral
Full Sun | Mounding/Trailing | Basket/Container
A vibrant addition to the Calibrachoa family, this mounding/trailing plant features small but plentiful blooms of varying shades of orange.
#4 Petunia Crazytunia
Mayan Sunset
Part-Full Sun | Mounding | Containers/Flowerbeds/Borders
Another unique addition to the petunia family, the Crazytunia Mayan Sunset features abundant blooms with yellow centres that blend out into varying shades of orange, pink and coral.
#5 Supertunia
Vista Jazzberry
Part Sun | Mounding | Containers/Flowerbeds
This Supertunia is a showstopper. A large, mounding and spreading plant, it features loads of colourful blooms that just don’t quit whether you use them in a container or flowerbed.
#6 Begonia
Fiona Rose
Part-Full Shade | Trailing | Basket/Containers
Semi-double flowers in a beautiful pink are framed by glossy green leaves provides an elegant touch to any container.
#7 Petunia Easywave
Lavender SkyBlue
Part-Full Sun | Mounding | Basket/Container
If you love purple then look no further than these new blooms. With their mounding habit they are a gorgeous addition to your hanging baskets or containers.
Did you know that your flowering indoor plants can transition to your favourite outdoor spaces, including your sunroom or porch?
We love using spring florals to add a splash of colour to our homes as we wait for our gardens to begin blooming. Not only does it breathe new life to our outdoor spaces, but it also does the same for your plant, giving it fresh outdoor air in which to thrive. Natural floral accents are also a great way to add a special touch to your Easter décor, from the classic Easter Lily to the elegant Azalea, there are so many plants that can be used to enhance your outdoor space.
So, if like us you can’t wait to see your favourite spring flowers gracing your porch or sunroom, we’ve put together our top tips for making sure your plants flourish as you transition them outdoors.
General Care when Transitioning Your Plant Outdoors
Transitioning your flowering indoor plant outdoors involves just a few simple steps to ensure it maintains its beauty and health.
Pick the Right Pot
Be sure your plant is in a pot that drains well and has good quality potting soil. If your plant came in a container that has a decorative wrap on it, it will be best to remove to ensure it can adequately drain.
Acclimate Your Plant to the Outdoors
It’s helpful to allow your plant to adjust to its new outdoor home by putting it outside for a few hours at a time to start, leaving it for longer periods until it’s hardened off. This will allow it to adjust to the change in temperatures, light and wind.
Pay Attention to the Weather
Your plant has grown accustomed to being in a climate-controlled environment. Be sure to keep an eye on the weather and if temperatures are going to dip below 10-12˚C bring them inside. Lower temperatures could set them back and it may take a while for the plant to recover.
Let there be Light (but not too much!)
Your plant will more than likely been receiving indirect light in your home, so be careful not to place it in direct sunlight. Choose a spot that provides partial sunlight. If your chosen location gets morning sun and shade during the afternoon, even better!
Don’t Forget to Feed & Water
Because your plant will be more susceptible to environmental conditions, it will likely need more watering and fertilizer to thrive. Be sure to keep an eye on the soil condition and adjust your watering schedule if needed.
Encourage New Growth
Keep your plant looking fresh and encourage new growth by deadheading.
Our Favourite Indoor Flowering Plants that Transition Well Outdoors
We have plants we love using outdoors during the spring months. From the Easter Lily, to the Kalanchoe, these plants transition well outdoors and add that fresh spring flare all of us green thumbs crave as we anticipate another growing season!
Easter Lily
The Easter Lily exudes grace and elegance with its large white trumped shaped flower. A symbol of life, purity, innocence, joy and peace, the Easter Lily has long been a primary symbol for this sacred season. White Lilies are mentioned frequently throughout the bible and are the most popular flower chosen to grace homes and churches each spring as a symbol of the resurrection and new life.
Hydrangea
A spring favourite, the Hydrangeas boasts small flowers that come together to create large domes of blooms. Coming in lovely soft colours like pink, purple or blue, they add the perfect accent to any Easter or spring-themed décor.
Kalanchoe
While you may think a succulent would be too tender to put outdoors in Manitoba, the Kalanchoe is small, but mighty. A striking plant with deep green leaves and clusters of tiny flowers that can be pink, yellow, orange, red or white, the Kalanchoe will brighten any outdoor space with its colourful blooms.
Primula
If we could choose only one word to describe the Primula, it would be vibrant. This spring-blooming member of the Primrose family is most often found in white, yellow, orange, red and pink each featuring a vibrant yellow eye that give these plants a unique and colourful look that is unstoppable.
Azalea
The Azalea is one of the most elegant plants around with bright coloured flowers and foliage that screams spring.While Azaleas are most commonly seen in shades of pink and purple, they can also be found in red, orange and yellow.
Cyclamen
Another member of the Primrose family, the Cyclamen has stunning green foliage that is topped by tall, graceful flowers. These beauties are commonly seen in red, pink, white and purple.
Because we all know you can never have enough plants! Propagating is an inexpensive and fun way to expand your plant collection and even share it with others. From indoor tropicals, to beautiful annuals, perennials, trees and shrubs, there are a variety of methods to creating your very own plant babies!
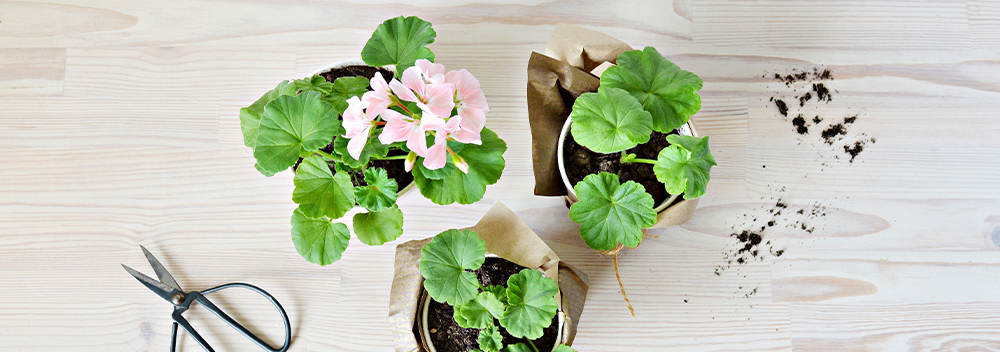
Geraniums
There are two ways to propagate geraniums:
1. Dry Store Over Winter
It may seem almost too easy, but dry storing your geraniums over the winter is a fabulous way to propagate these garden favourites. Before the first frost, dig out any healthy geranium plants you would like to store, then follow these easy steps:
Tidy your plant roots by shaking off any excess soil, they don’t need to be perfectly clean, just enough to avoid making a mess and prevent rotting.
Lay them in a shaded area to dry.
Once dry, place in a cardboard box or paper bag with a closed top and store in a cool, dry place.
Check on the plants occasionally to ensure you don’t notice any signs of mould or extreme dryness. Both of these can be managed by either trimming off areas with mould, or soaking the plant briefly in water to rehydrate.
Once you’re ready to prep for planting, trim back the geranium to the healthy green growth.
Fill a container with dampened soil and place the stem deep enough to cover two leaf nodes.
It takes about 7-14 days to start seeing new growth, and if you water thoroughly, in about 4-6 weeks the plant should be ready for its move to your garden.
2. Live Storage/Grow Indoors
Geraniums are a beautiful plant and provide such a wonderful summery scent so you may want to have your plant indoors for the winter to enjoy it year-round. Geraniums need the following to stay healthy indoors during the winter months, including:
4- 6 hours of sunlight per day.
A well-draining plant pot.
Quality potting soil that provides adequate drainage to avoid root rot.
Once spring arrives, follow these easy steps to make cuttings for your brand new geranium babies:
Using a sharp, clean tool make 4-6 inch cuttings, removing lower leaves, leaving few sets of leaves at the top.
In a small pot or tray, place the cuttings with the bottom half buried in a dampened rooting medium. Be sure the medium is a well-draining blend (we suggest one that includes peat moss, perlite or vermiculite).
Place the cutting in a warm location with bright, indirect sunlight, watering only when the soil feels dry.
Roots should establish in approximately 3-4 weeks and once formed will be ready to pot in preparation for transplanting in your garden.
Begonias
One of our favourite plants, begonias can be propagated using a method called vein cutting. To propagate your beloved begonias, try following these steps:
Cut a healthy leaf that has a prominent vein from your plant right at the base.
Trim the stalk off so you’re left with just the leaf.
Make cuts on the underside of the leaf’s main vein and place or pin the leaf, vein-side down so it makes firm contact with your rooting medium (we suggest vermiculite as it will provide the best balance of moisture and oxygen for your developing plants).
Place your container in an area where you can provide adequate humidity and light. You can cover with a dome or a plastic to keep moisture in, and it is helpful to mist regularly, watering as needed.
With sufficient warmth and moisture, your begonia babies will start to emerge from the cuts in the vein after about 6 weeks.
Once the new growth has reached approximately 3” in height and have a few leaves they’re ready to transplant into small pots to further establish their roots in preparation for replanting in a larger pot or into your garden come spring!
Fun fact! You can propagate certain houseplants using the vein cutting method as well, including African Violets.
Shrub & Trees
It may seem like shrubs and trees would be too complicated to propagate, but they’re no different from any other plant and can be so satisfying to see something so small grow into a major focal point in your landscape. To propagate shrubs and trees, follow these steps:
Take cuttings from your existing plant using a sharp tool, preferably in late May through early July from the new season’s growth. We recommend using a cutting that has some flexibility but that will break if bent.
Remove any flowers from your cuttings and make a fresh cut below where one or two leaves are attached to the stem.
Dip the freshly cut ends into a root hormone. We love Evolve I-Root #1 Rooting Gel, but any quality root hormone will help promote new growth in your cuttings.
Choose both a rooting medium and container that provide good drainage.
Fill your container with rooting medium and water, allowing it to drain for a few minutes.
Insert cuttings approximately 2” deep and place in bright, indirect light. You can cover with a dome or plastic to help maintain moisture. You’ll want to keep the soil moist as the cutting begins to develop new growth.
Your new tree or shrub growth should make its first appearance around 6-8 weeks. Once there is a well-established root system, carefully transplant cuttings into individual pots.
After a few additional weeks your tree or shrub baby should be ready for you to prepare it for its move outdoors.
Perennials
Perennials can be propagated in several ways and are a popular choice for gardeners to expand their gardens and share the beauty of their plants with others. To get started, you’ll want to choose your healthiest plants for dividing to ensure they flourish in their new home. Plants that flower in the fall are ideally divided in spring, and those that flower in spring divided in early fall. How you propagate your perennials depends on the type of plant you want to divide, for example:
Clumping
A clumping perennial, such as day lilies, rudbeckia or hostas can be easily divided by digging up the entire plant and finding a natural point in which to separate into new plants. You may need to cut apart a few roots if the clump is tightly packed but choosing a spot where there is the least resistance to cutting is the way to go. Any portion you divide should have green above ground and roots below.
Spreading
Spreading perennials, such as phlox, clematis and coneflower don’t clump together but rather grow in groupings of individual plants.
For spreading perennials, you can simply dig up any portion you want to move, leaving the main plant untouched.
Woody
Woody perennials, such as lavender and rosemary feature one main stem but can spread when the stem touches the ground and takes root. Sometimes this may happen naturally, or you can layer the stem in soil to create an opportunity for new roots to develop. If roots develop, you can then cut and dig up the new stem without having to touch the main plant.
Taproot
Taproot perennials, such as oriental poppies, lupine and butterfly weed have one main root. To divide it takes a bit more bravery than simply separating roots. With taproot perennials, you will dig up the plant and cut so that each portion has a piece of the taproot along with some growth buds.
Once you have your new perennial babies divided, it is time to replant! Dig a hole that is slightly wider than the roots and at approximately the same depth as the original plant. Fill in with soil and fertilizer and pat down, watering thoroughly once planted. Continue to water often for the first month to promote root development and watch your new plant flourish.
House Plants
Succulents
Propagating succulents is an easy way to continue to grow your tropical collection or share your favourite plants (they can also make a fabulous gift!). To begin, cut a few healthy leaves from the base of your plant being careful to remove the entire leaf in one, undamaged piece. From there:
Place your cuttings in an area with bright, indirect sunlight and leave for approximately four days to allow the ends to callus over.
After the leaf has calloused over, take your container and fill with a rooting medium that provides excellent drainage.
Water soil and place cutting on top.
It is important to keep your cuttings moist and warm, misting regularly can help to let those babies grow!
After 3-4 weeks new sprouts should emerge and after 7 weeks small leaves and roots should begin to form.
After 7 weeks you should have new growth large enough to separate from the cutting and plant it its own pot which can be cared for like the original succulent plant.
Plants that Have Bulbs
Houseplants with bulbs are another popular plant to propagate. Think of plants like the asparagus fern and ZZ plant. This is not only a great way to expand your indoor garden but can also help to maintain the health of your plant by avoiding overgrowth and crowding in your pots. The first step in propagating these plants is to carefully remove it from its pot, from there:
Gently shake off any excess soil from the roots.
Examine your plant, looking for its bulb offshoots to divide in sections ensuring that all sections have sufficient roots to grow in their new home.
Return the original plant into its pot, replacing any soil as needed.
Plant the new bulb groupings in a pot filled with a quality potting mix about as deep as it was in your original plant.
Continue to care for the plant as you did before.
Houseplants with Petioles and Leaves Coming Off a Main Stem
Have houseplants with petioles and leaves that come off the main stem? Petioles are the stalk of the leaf that attaches to the main plant stem. We’re talking fiddle leaf figs, schefflera and African violets. If so, then you can use this method to propagate your plant:
Cut your chosen leaf petioles at the base, trimming so they are approximately 3-4 inches in length. You’ll want to choose cuttings from more mature sections of your plant to get the best roots.
Dip your petiole in a rooting hormone and then nestle into your chosen rooting medium ensuring the leaf isn’t in contact with the soil.
Water, allowing to drain for a few minutes before covering with a plastic bag or dome to maintain moisture. When choosing your rooting medium look for options such as vermiculite and perlite that won’t pack down and retain too much moisture.
Place in a warm area with bright, indirect light until new growth develops, typically in about 6-8 weeks.
Once the leaves of new plants have begun to develop, carefully separate them and pot into their own containers using a quality potting mix.
Plants are our passion and we love helping people get their gardens, indoors and outdoors, growing. If you have additional questions about propagating your plants, get in touch, we’d love to hear from you!
Manitoba is beginning to look a lot like Christmas! With snow on the ground and joy in our hearts, we’re all looking forward to that most magical time of year. Now that we’re well into November, it’s time for one of the best parts about the holidays—the decorating!
Holiday decor is essential for creating the festive ambience that defines the season. We love how each year brings new trends, along with the reinvention of old traditions. No matter what your taste, make sure to add these decorating projects to your holiday prep checklist!
Outdoor Decor
In Steinbach, we’re lucky to live in a bonafide winter wonderland at this time of year! While Mother Nature is happy to do some of the decorating for you, you can add some extra sparkle with these gorgeous pieces of outdoor holiday decor.
Porch Pots: Here at Oakridge, we love our porch pots! If you’ve never had them before, holiday porch pots take the place of container gardens in the winter. We love to craft them with fresh evergreen boughs, showy ribbons, birch or dogwood branches, holly berries, and ornaments, like angels and jingle bells. If you make your own porch pot, you can customize them to the theme of your choosing. If you don’t have the “craft bug”, though, you can simply visit our garden centre 1 mile west of Steinbach. We carry beautiful, pre-crafted porch pots handmade by our in-house designers.
LED Lights: It’s no secret that string lights are a classic holiday decorations, and LEDs are the best value for your money. Unlike traditional incandescents, LED string lights last for years without needing to be replaced. They also give off no heat, which makes them safer for your decorating your home, trees, and shrubs.
Your lights will look beautiful whether you only choose to trim the edges of your roof, or if you shroud your entire yard with twinkling lights. However, if we can offer one piece of advice, your display will look best if all the lights are the same colours. For instance, if you go with multi-coloured lights on your roof, opt for the same colours in your shrubs. We also recommend incorporating at least some white lights into your display, as they shine brightest and help bring out the other colours you’ve chosen.
Wreaths: After November 12th, wreaths are a must-have item for every door! We love to coordinate the theme of our wreath with the colour scheme of the rest of our outdoor decor. Depending on whether you want to re-use your wreath, you can craft them from lifelike or living evergreen. If you’re a purist and love the smell of the real thing, we carry a selection of beautiful handmade wreaths at our garden centre.
Window Dressing: For those who really love to get in the spirit, a little window dressing can tie the whole look together. Try adding a garland of fresh evergreen and holly berries to your window boxes or use hot glue to attach suction cups to mini-wreaths or holiday bows and affix them to your window panes.
Indoor Decor
After a long day, who doesn’t love being greeted with a home filled with the sights and scents of the holidays? Set the scene with these festive adornments for the home.
Mini-Trees: This year, we’re seeing a trend of incorporating multiple small trees, like dwarf spruces, throughout your home to compliment the family Christmas tree. There are so many adorable ways to make this trend work for you. Try matching the colour scheme of all the trees for a cohesive look or let everyone in the family decorate a personal mini-tree before decorating the family tree together.
Poinsettias: Everyone’s favourite holiday houseplant that never goes out of style, poinsettias can be worked into your table decor, placed on your mantel, or kept in the bathroom for a burst of seasonal life. Don’t forget that there are many colours of poinsettias, not just the classic scarlet red! Try a pretty ivory variety or a two-toned plant in peppermint shades of red and white.
Home Fragrance: We’re of the opinion that fragrance completes any indoor space, and during the holidays, the very best ones are in-season! At Oakridge, we carry a range of handmade candles, as well as a line of diffusers to gently release your favourite aromas into the air. Try spicy blends with notes of cinnamon, clove, or apple to give your home the smell of fresh holiday baking. Or, if you prefer fresher scents, give your home that Christmas tree scent with the fragrance of balsam fir.
Plush Textiles: Around this time of year, everyone in Manitoba is happy to stay bundled up all day and all night. Embrace the concept of hygge, a Danish word that roughly translates to “a mood of coziness”, by filling your living spaces with soft and comfy fabrics. Cable knit and faux-fur are both very popular for 2019. Try incorporating them with throw pillows, blankets, chair covers, and even your Christmas tree skirt.
Easy & Beautiful Centrepieces: We all look forward to Christmas dinner for the chance to connect and be merry with the whole family. A beautiful table sets the mood for a joyful night, and it doesn’t have to be difficult to achieve! You can beautify your tablescape with cuttings of fresh greenery, like pine or eucalyptus, paired with a row of evenly-space white votive candles. If you like, you can even add extra magic with a string of delicate fairy lights.
With these simple and elegant additions, your home will be ready for Christmas from the inside out. But don’t forget to tick the final box on the checklist—taking some time for yourself. Make sure to give yourself the gift of time to curl up with a hot drink and enjoy your beautiful surroundings. After all, to truly enjoy the holidays, you have to take one!
6 Simple & Elegant Thanksgiving Crafts for the Whole Family
When the scenery around Steinbach looks painted with a warm palette of colours, we look forward to a cozy evening making Thanksgiving crafts. While the holiday embodies some of the most beautiful themes of the season, we’ve noticed that many of the most common Thanksgiving craft ideas aren’t always compatible with our interior decor. But, these simple and creative projects make it easy to create decor pieces that complement your style!
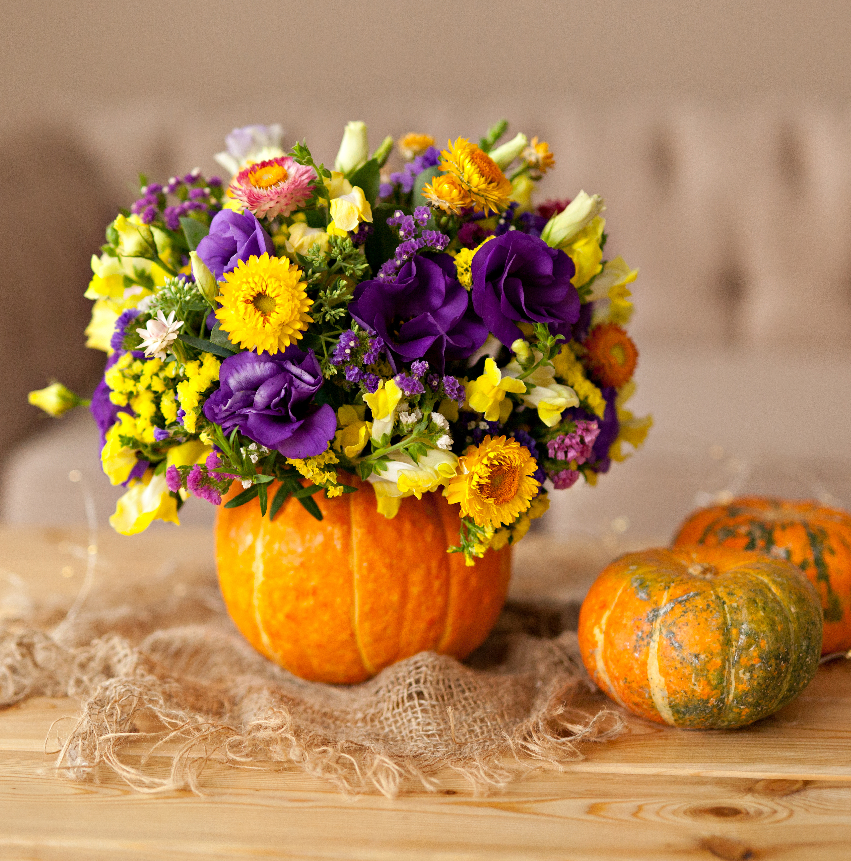
Pumpkin Vase
You may have seen variations on this genius craft all over Pinterest. What makes it so brilliant is how customizable it is to your tastes. You can choose to use craft pumpkins and silk flowers for a final piece that can grace your table year after year. Alternatively, you can substitute for real pumpkins and fill the vase with fresh, fall flowers, like vibrant chrysanthemums from our garden centre.
You’ll Need: A pumpkin, flowers, and a sharp craft or pumpkin-carving knife.
Before you get started, choose a colour palette that suits your decor scheme. You can opt for a selection of warm, fall shades, with an orange pumpkin and flowers in tones of yellow, orange, and red. Or, you can choose a white pumpkin, which provides a neutral base for muted shades, like sage green, rose gold, beige, or ivory.
Simply cut off the top of the pumpkin, scoop out any insides (if using fresh), and arrange your floral bouquet inside.
Garland of Gratitude
We have a lot to be thankful for here in Steinbach: a great community, caring neighbours, great local businesses—the list goes on! If it’s important to you to emphasize gratitude this season, the Garland of Gratitude is one of our favourite thankful craft ideas. The garlands can be used to decorate your mantel, adorn an entryway, or surround a centrepiece. Best of all, they’re a great way to include everyone in your family—including less-crafty spouses!
To start, create a stencil from cardboard in your preferred shape. Shapes that work best are “flag” shapes, like triangles, or you can opt to create stencils of every family member’s handprints by tracing and cutting them out. Then, trace the stencil onto craft paper, creating multiples of your stencils in two to three shades of paper.
Next, cut out your craft paper shapes and punch holes at the top of each shape where you’d like your twine to go.
Then, divide the shapes evenly among your family members and ask each family member to think of a list of things they are grateful for. Ask them to write “I am grateful for…” on each shape, completing the sentence with something from their list.
If your children are old enough to be trusted with permanent marker, metallic marker looks wonderful with this project. However, any marker or paint will do. The project looks best if the marker colour coordinates nicely with your choice of craft paper.
Tiny Hands & Feet Turkey
As far as Thanksgiving craft ideas for toddlers go, most of us look for projects that allow us to control mess and create something memorable without needing to keep their attention for too long. Not only are these the most adorable of any turkey craft ideas we’ve ever seen, they also make heart-warming, kid-friendly Thanksgiving decorations.
You’ll Need: Newspaper, 2 sheets of white cardboard, baby wipes, a garbage bag, a picture frame, paper plates, googly eyes, yellow craft paper, glue, washable acrylic paint (in brown, orange, yellow, and red), and a warm bubble bath, ready to go!
Prepare by covering your bathroom floor with newspaper and running a warm bubble bath for your child. With a garbage bag at the ready, stack four paper plates and place them next to your bottles of paint.
In the bathroom with the door closed, sit with your child on the newspaper. Put some yellow acrylic paint on a paper plate, and get them to stamp the half of the cardboard with yellow handprints. Wipe their hands with the baby wipes, set the cardboard out of reach, discard the first paper plate in the garbage bag, and repeat with the orange paint while asking your child to stamp their hands overtop of the yellow prints. Repeat the process again with the red paint.
After wiping off their hands again, prepare the final plate with brown paint. Sit your toddler on the closed toilet seat and stamp their feet in the paint, then on the second sheet of white cardboard. Set the second sheet to dry, give their feet a wipe, and plop them in the bath to wash off the rest!
Once the paint is dry, you can cut out the foot imprints along with the overlapped hand prints. Choose the ones that turned out the best and assemble the turkeys. Make the turkey body with upside-down footprints, and glue it onto the handprint “feathers”. Also glue on googly eyes and make beaks with the craft paper. Then, frame your turkeys in an old picture frame and display for all your dinner guests!
Fall Tablescape
We love creative Thanksgiving art ideas that allow you to express your own style. Tablescapes are a perfect way to create the look you love using your favourite fall themes. You can combine other Thanksgiving crafts, like your pumpkin vase, into this one to create a beautiful vignette.
You’ll Need: Burlap table runner, fall-themed items (mini pumpkins, pinecones, acorns, ornamental corn cobs, etc), real or silk botanicals (eucalyptus, succulents, etc), candles and a tablecloth in coordinating colours.
Set the scene by dressing your table in the tablecloth and laying down the burlap runner down the centre, running lengthwise. Start your tablescape by placing your focal point. This is typically the largest item you plan to use. Place it in the centre of the table and start adding smaller items, grouping them as you like. If you’re unsure, try placing your items with the larger items nearest your centrepiece and place smaller and smaller items next to them.
Arrange candles along both sides of the arrangement, spacing them out evenly and symmetrically. Lastly, look at your tablescape from several feet away and rearrange until you’re happy with the finished look.
This project is a beautiful way to preserve pretty fallen leaves or simply capture the fall leaf aesthetic. We love these Thanksgiving mason jar crafts for adding a touch of warmth to any surface, big or small!
You’ll Need: Clean mason jar, mod podge, a paintbrush, latex or rubber gloves, fall leaves (real or silk), and a candle.
Wear gloves throughout the project. Decide where on the mason jar you want to place your leaves before applying mod podge. When ready, use the paintbrush to apply a little bit of mod podge to the surface of the mason jar to adhere the leaves in place.
Next, coat the top of the leaf with mod podge to lacquer the leaves down and in place. Coat the entire exterior of the jar in mod podge so the texture is consistent—this will create a slight diffusing effect on the candlelight.
When dry, place an appropriately-sized candle in your mason jar. The candlelight will shine through the leaves and create a warm glow!
Autumn Wreath
One of our favourite handmade Thanksgiving decorations, autumn wreaths make a beautiful statement over your front door or perched overtop of your fireplace. These crafts can be created with both silk florals and fresh-cut flowers!
You’ll Need: Undecorated grapevine wreath, glue gun, craft wire, and your choice of botanicals (try silk mums, fall foliage, sunflowers, or mini-pumpkins).
Rough out your wreath by placing your botanicals around it before gluing or wiring down. If you’re unsure about placement, try choosing a focal point (normally the bottom centre) to place your most voluminous item. Cluster medium and small items around the focal point and evenly space the rest of your materials all around the wreath.
When you’re satisfied with the design, secure all items in place with hot glue and craft wire.
All of these Thanksgiving crafts can be modified to suit your taste, so we encourage you to experiment! If you love these fall looks, but don’t have time to achieve them on your own, we invite you to browse our home decor collection at our garden centre in Steinbach. Sometimes a little time saved gives us a lot to be thankful for!
When you spend all year pouring your heart into your vegetable garden, the last thing you want is to let any of your precious harvests go to waste. Fortunately, you can preserve the bounty from your garden to keep your pantry stocked with homegrown food through another long Steinbach winter. You can even make it a family tradition to prepare your Thanksgiving and Christmas dinners with herbs and vegetables you grew in the summer! Here are some of our favourite methods for preserving garden vegetables and herbs.
Methods for Preserving Herbs
Who doesn’t love the satisfaction of snipping off a sprig of fresh basil, parsley, or cilantro from your summer herb planter just before adding it to a dish? Sadly, the season for growing herbs in a Steinbach garden never seems long enough, but the good news is you can make the flavours of your herb garden last long after the frost through all sorts of canning and preserving methods.
The preservation process can even intensify the flavours of some herbs, allowing you to experience your herb garden in a whole new way. Here’s how to preserve fresh herbs using ingredients and equipment you likely already have in your kitchen!
Preserving Herbs by Freezing
Freezing herbs is a quick and simple way to keep a burst of flavour handy! For the most intense flavour, use a food processor or small blender to grind fresh herbs into a paste and use it to fill an ice cube tray. Once frozen, pop out the cubes and store them in a labelled airtight container in the freezer. (Try using chalk markers to label the container with the herb and expiry date!) One cube should be enough to flavour most recipes in the last stages of cooking. This method keeps the herbs tasting fresh for up to 6 months.
Preserving Herbs in Salt
This method lengthens the life of your herbs and leaves you with a ready-to-use seasoning! After washing your herbs, coarsely chop them and add them to a mason jar. For every 4 parts herbs, add 1 part kosher salt. Seal the jar and shake the mixture to combine. Add a scoop of the herbs to add an intense burst of flavour to your recipes. Keep in mind that the salt will come with the herbs, so make sure to adjust your recipe’s salt content accordingly. This method will preserve herbs for up to two months.
Preserving Herbs in Oil
Another trick that requires an ice cube tray. Place a generous pinch of fresh herbs into the compartments of a clean ice cube tray and cover them with extra virgin olive oil. Since the oil can go rancid if kept at room temperature, it’s best to freeze the cubes. The oil will take on the flavour of the herbs and add fabulous flavour and texture to your recipes. This is an especially delightful way of preserving basil for adding to pasta recipes! In the frozen oil, your herbs will stay delicious for 6 to 9 months.
There’s a reason most folks buy their herbs pre-dried! Dry herbs are more potent than fresh herbs and last a long time in the pantry. The herbs that work best for this method are thyme, rosemary, oregano, sage, and marjoram. The two primary methods for drying herbs are to hang them upside down for several days (which is the slower but more romantic method!) or place them on a cookie sheet and bake them in the oven for 1-4 hours at 150 ̊F. The herbs are ready when the leaves crumble easily. The dried herbs can be stored in an airtight container for up to a year. Store in an opaque container or a dark place to keep them fresh as long as possible! To activate their flavour, rub them between your fingers to grind them up a bit before sprinkling them onto your food.
Vegetable Preservation Methods
If you’re a vegetable gardener, you know how much love goes into every ripe tomato, bulb of garlic, and freshly-pulled carrot. These veggies are worth their weight in gold, so why not keep them fresh to enjoy your riches through the colder months? There are several ways of preserving vegetables that require very little prep and maintain the nutrients and flavours of your harvest. Here’s how to preserve fresh vegetables at home.
Pickling Vegetables
Pickling is easy to do and enhances the flavour of your veggies. No wonder it’s such a popular method of preserving vegetables! Pickling is a shorter-term method for preserving veggies but it’s a great choice if you love adding a little zip plus some extra shelf life. The simplest way to pickle is with the “quick pickle” method. Boil 2 cups each of water and vinegar, plus 2 tablespoons of kosher salt and 3-6 tablespoons of sugar according to taste. In a sterile mason jar, add the veggies you want to quick pickle. Get creative with flavour combinations, as each veggie in the jar will impact the overall taste of the pickle! Pour the pickling liquid into the jar and let stand for 2 hours or until cool. Then, seal the jar and refrigerate. The quick pickles will be ready to add to your charcuterie board in about 8 hours, but they’re much better when prepared at least a day in advance. Keeps veggies fresh up to 3 weeks in the fridge.
Preserving Vegetables in the Freezer
Freezing vegetables keeps their flavour well-intact for a longer spell than quick pickling, but the process is a bit more involved than it is with freezing herbs. Before you begin, do a quick search online to ensure the veggies you want to preserve are okay to freeze.
Veggies must be blanched before they can be frozen. Boil water in a large saucepan and, separately, prepare an ice bath in a large mixing bowl. Use a mesh strainer to hold veggies in boiling water for 1-2 minutes, until the colour intensifies slightly but the veggies are still crisp. Then quickly remove the veggies and plunge into the ice bath. This will suspend the nutrition, flavour, and colour of the veggies from breaking down while frozen. Allow veggies to drip dry or shake them gently to remove excess water, then place them in freezer bags. Store your freshly blanched veggies in the freezer for up to 6 months.
Canning Vegetables
Canning vegetables requires the use of a pressure canner, but it is an extremely effective method for preserving vegetables for longer periods. You’ll need sterile jars for canning, and they’ll need to be kept completely sterile until it’s time to place the vegetables inside. Before canning, fruit veggies should be chopped or segmented and boiled for 5 minutes to cook out any remaining bacteria. When you’re ready to can, follow the pressure canner directions to the letter! If done properly, canned vegetables can remain edible for up to 5 years!
Preserving your herbs and vegetables is an excellent way to enjoy your vegetable garden long after the frost, and here in Steinbach, we’re always in favour of saving ourselves a mid-winter grocery run! With just a little planning, you’ll enjoy some serious cost savings and nutritious, homegrown food all year long.
You don’t have to look too hard to find a gorgeous vegetable garden in Steinbach. However, when it comes to fruit, our options are a little more limited. Unlike places further South where most of our fruit at the supermarket comes from, we have a limited number of hot days throughout the year. Without that heat, it’s pretty tough to grow things like pineapples, mangoes, and citrus. However, there are still plenty of fruit trees that thrive in our Manitoba climate while offering us delicious, world-class produce.
Where to Plant Fruit Trees
If you want to grow your own private little Manitoba orchard, placement is key. Fruit trees aren’t exactly a cinch to move!
Choose a spot in your yard, ideally behind a fence, that gets ample sun exposure. The fence is important both to keep pests — like rabbits and deer — away from your tree. It also protects trees from wind, which can knock fruit off the branch prematurely.
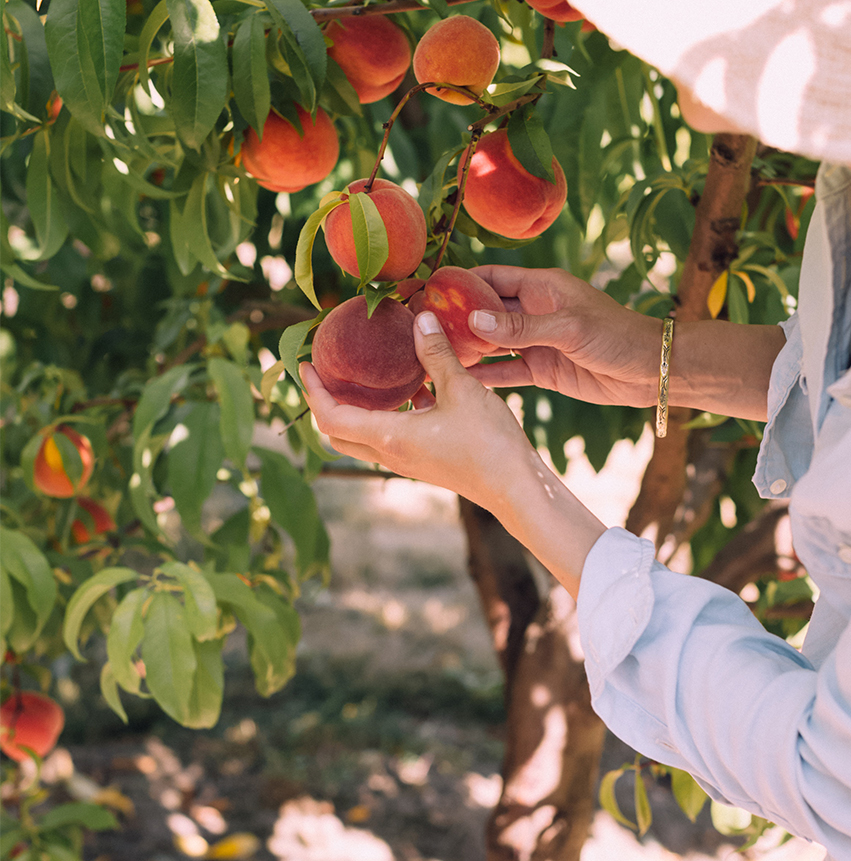
Apple Trees for Manitoba
With so many great hardy cultivars available, it’s no wonder Manitoba embraces the apple so much. Out in Morden, they celebrate them with the Morden Corn & Apple Festival. You can celebrate them right here in Steinbach with your very own apple trees!
Apple trees are beautiful and practical additions to your landscape. In the spring, long before harvest, the trees overflow with breathtaking, fragrant blossoms. By the late summer and fall, those pretty flowers will have grown into juicy, edible fruit.
For the best yield, you’re better off choosing two of these varieties to take home rather than just one. This is because each of these apples needs a second apple tree of a different variety for pollination. If you already have an apple or crabapple tree in your yard, that will do!
Norkent Apple Tree – This popular apple has a sweet flavour and crisp texture. The skin is light green with scarlet red stripes. A great choice for fresh eating, cooking, and baking. Hardy to zone 2b.
Parkland Apple Tree – These tasty apples are a fantastic all-purpose fruit. The apples are attractive with pale yellow-green skin and a red blush. Good for fresh eating, cooking, baking, and storing. Hardy to zone 2.
Goodland Apple Tree – While known to be a more high-maintenance tree, Goodland apples have some of the best flavour of all the hardy apples. They have green skin and a reddish blush that looks as amazing as they taste. Fresh eating is the best way to enjoy a Goodland, but they’re good for cooking as well. Hardy to zone 3a, Goodlands are a better fit for properties a little further west of Steinbach.
Fall Red Apple Tree – Like the Goodland apple, Fall Red has a great flavour and texture for fresh eating. The skin has more of a red colour than the Goodland. Fall Reds are great for fresh eating and cooking and are hardy to zone 2.
Are you not much of an apple person but love the idea of owning a fruit tree? Here are a few delicious alternatives from the prunus family. Like apples, these fruit trees offer a fabulous spring display and yummy fruit in the summer.
Westcot Apricot – If you’re in zone 3a, the Westcot apricot is a lovely fruit option that produces sweet, juicy fruit with a showy, peachy-orange colour. Eat them fresh or cook them into jams and jellies.
Cupid Cherry – A beautiful and hardy cherry, Cupid is a cultivar developed in Saskatchewan that performs in colder climates. A compact option, Cupid is actually a cherry shrub, reaching only about 8 feet in height. The fruit is dark red, juicy, and sweet with a mild, astringent quality. Hardy to zone 2a.
Caring for Fruit Trees
Once you take your tree home, proper care is vitally important to ensure the tree establishes properly and bears fruit as quickly as possible.
Prepare the soil by adding compost and removing all weeds from the area before you plant. Once the tree is planted (per the guidelines from our garden specialists), water the roots deeply. Keep soil moist consistently for the first full season of planting by watering 2-3 times per week. Using mulch can help the soil retain moisture and prevent weed competition.
After the first year, continue to water weekly to biweekly during the growing season until the tree is well-established.
Fertilize fruit trees with a 20-20-20 water-soluble fertilizer. Apply fertilizer immediately after watering for best results. Always follow the fertilizer package directions to find out how much to use and how often to apply.
Once your fruit tree is established, it’ll quickly become part of the family. There’s nothing better than picking fresh fruit with your kids or grandkids at the height of the season! Except, perhaps, serving a Thanksgiving pie made from the fruits of your little Manitoba orchard.
Shopping for new and trendy annuals every spring and summer is certainly fun and exciting, and it keeps your garden looking fresh. But without some reliable perennials, your garden may end up looking a bit dishevelled. Perennials add structure, visual anchors, and develop the landscape of your whole yard.
Perennial Garden or Border
You can plan a bed that’s entirely perennials or you can tuck perennials into the borders of your beds and let perennials and annuals complement each other. Planting perennials as the borders to your garden is the perfect way to build your favourite blooms into the actual landscape of your garden. They are a great way to add a lot of impact to your garden with only a little bit of effort.
Perennial Borders
Borders give your garden clean lines and act as a frame for your landscape. There is plenty to consider when planning your perennial garden, though—things like size, type of perennial, colour and time of blooms and foliage, style, and growth habit. Remember you are making a commitment to supporting the style or function of the rest of your garden. Consider these questions while planning: Do you want pretty flowers that will draw in pollinators every season? Or maybe a gorgeous bloom that you’re in love with and want to see year after year? Perhaps a beautiful texture or growth pattern that compliments your garden and landscape?
Building Your Own Perennial Border
Many people think that our perennials are limited by our harsh winters, but there are so many colourful and exciting options to choose from that are hardy for the area around Steinbach. Here are a few things to think about when planning to add stunning perennials into your landscape:
Texture and Shape
A perennial border is a great opportunity to mix in some of our favourite native plants that have great textures. Using something low-growing with a great texture, like a creeping plant, or mounding flowers, like Hen and Chicks, Creeping Thyme, or Yellow Sundrops—these will give you something a little different than the bold vertical lines that you get from various ornamental grasses or perennials, like Karl Foerster Grass or Black-Eyed Susans, which are also different from the semi-tropical vibes you’ll get from hostas.
Choose textures in your border that either compliment or mimic the surrounding landscape—or choose something with a function, like using taller perennials as a privacy screen along fences or the edge of your yard. What better way to highlight your home and landscape than with plants that bring a style of their own!
Location, Location, Location
Perennial borders are a good way to squeeze out some beauty from every part of your yard, so don’t be afraid to mix it up! You can tuck perennials into the tiniest of spaces to add unexpected pops of beauty. Additionally, think of how they can be used with your existing landscape, like fences, gardens, patios, and walkways.
Sun and Shade Perennials
Don’t be afraid to embrace the full sun with colourful flowers like Coneflowers, Peonies, and Stonecrops. For shadier parts of your yard, you can fill them with gorgeous plants like Hostas, Daylilies, Irises, or Bugloss.
Pollinator Favorite Perennials Native plants are the perfect option to make your garden a favourite with pollinators. They’ll love having access to the plants they recognize and love, and having them return year after year will help your garden flourish. Pollinators are welcome visitors not only for the help they give your plants but also for their pretty appearances!
Plan and Plant an All-Season Look
Choosing bright foliage, like a Japanese Aralia or a Gold Heart Bleeding Heart, in addition to brilliant blooms is an easy way to make sure that your garden looks top-notch all season. You can select different perennials that have blooming times spread all across the season so that there’s always something that’s bursting with flowers and colour for you to enjoy.
Stage Your Look
Just like any good elementary school choir, you’ll want your tallest in the back, the shortest in the front, and your stars right in the centre for everyone to see. Organize your perennials to fill your border and draw the eye through the flowerbed, just like you’d plant a container, but bigger! When you bring your new perennials home, take some time to set them out in your perennial bed in their pots. This way, you can stand back and visualize how they’ll look in the ground and move them around. Try them in a few different spots before you put them in the ground. Also, remember to incorporate and repeat the same colours throughout the garden for a more cohesive look.
Winterize Your Perennial Border
Many gardeners get nervous about our Steinbachwinters, and it’s understandable. It can be intimidating to plant something and hope that it will tough out the worst of the winter and emerge ready to thrive next year, but it’s easier than we think!
Choosing native plants and those that are hardy to our zone (3b) is the first step towards perennial success. While you can usually baby some zone 4 plants through the winter by covering them with leaves or flax straw, sticking to plants in zone 3 or tougher will be a much less stressful way to make your perennials anchor your garden.
To help ease your plants into the winter (and to make your perennial garden look even more polished), try adding a layer of mulch after you plant so that the roots of your plants will be better insulated when the mercury drops.
A perennial garden is a great way to add lasting style to your yard to keep things stress-free when it comes to designing an annual show of colour. They offer a great look for any landscape while also being a fantastic boost to your garden’s health. And with so many options that are both pretty and functional, it’s easy to get excited about adding perennials to your yard!
We’ve been experiencing a bit of drought here in Steinbach—although the last few days of continuous rain may have us feeling like less of one—and our lawns are bearing the brunt of it! A lot of folks have been asking how best to keep their lawns from drying out. The truth, in short, is that proper lawn care throughout the year is the key to drought-proofing. This lawn maintenance calendar can help you improve the quality of your lawn next year. Luckily, even if you’ve skipped overseeding this spring, you can still reverse lawn damage by starting today.
Spring Lawn Care
Your lawn maintenance schedule in the spring is much more demanding than what you can expect for the rest of the year. However, if you move fast with spring care, your lawn will be much easier to manage for the rest of the year.
Clear Debris – Rake out the lawn to clear branches, thatch, and leftover leaves from the year before.
Aerate the Lawn – Soils in Steinbach, like other areas of Manitoba, tend to be clay-based, which leads to compaction. Aeration is important for reintroducing oxygen into the soil ecosystem and allowing fertilizers and grass roots to penetrate deep into the soil.
Apply First Application of Fertilizer – Apply a good, quality timed-release fertilizer in early to mid-May. We recommend ProScape 33-0-11 or, if you’re looking for an organic alternative, Evolve has a great one! Use a rotary spreader for even, quick application. Apply fertilizer on a dry lawn and then water immediately to dissolve the formula into the roots.
Topdress – Adding fresh, new, compost-enriched soil over the aerated area supplements the compacted clay with soil that is easier for grass seeds to establish in.
Overseed – Hand seed or use a rotary spreader to apply fresh grass seed to replace dead grass from the year before. Water deeply after planting.
Irrigate – Water grass daily until the grass seed has germinated and grown a few inches. Then slowly space out waterings further apart to encourage grass roots to grow deeper into the soil.
Manage Pet Damage – If your pets relieve themselves on your lawn in the wintertime, you’ll likely notice some brown, dead areas. Repair these areas by de-thatching, aerating the area, and applying some Evolve Dog Patch Repair, which does an amazing job at reversing damage quickly and effectively. Then, topdress the area with fresh soil enriched with compost and overseed with new grass seed. Allow the new grass to establish before mowing.
In the summer, most of your lawn care time will be spent keeping the grass at the right height. Meanwhile, these additional tasks will also keep your lawn looking its best.
Apply Second Application of Fertilizer – Use a rotary spreader to apply the second application within the first two weeks of July.
Mow High – Cut grass to about 4 inches in height in the summer to help with water retention. This also helps prevent weed growth, as less sunlight hits the soil surface, therefore impeding the germination of weed seeds.
Water Deeply – Water your lawn early in the morning as needed. It’s a much better idea to water your lawn generously, but infrequently, as opposed to frequent light watering. This is especially important during times of drought.
Fall Lawn Care
In the fall, lawn care is about preparing the area for winter and the following spring. You’ll thank yourself in May!
Rake Well – Remove fallen leaves and thatch regularly to prevent breeding grounds for pests and diseases.
Cut Lawn Before the Snow – A final mow should be done toward the end of the season. This prevents you from needing to remove a layer of heavy, dead grass from the yard after the melt.
Apply a Fall Application of Fertilizer – A lawn that lasts even the coldest Manitoba winters has excellent roots, and a fall application of fertilizer is a great way to promote root development that will transform your lawn into an overwintering pro!
Overseed – Overseeding your lawn in fall allows the spring melt and change in temperature to germinate the seeds early on in the spring. You do not have to overseed in both spring and fall, but you should overseed at least once per year. If you choose to overseed in fall, try to time it just before a snowfall so you don’t need to water the lawn.
Lawn Maintenance Through the Year
These best practices will keep your lawn looking enviable all year:
Weed Control – The weeds we have in Steinbach are relentless, so a strong weed control plan is always a good thing to have. Check your lawn for weeds daily and hand-pull them so you can remove them before the roots grow too deep. If you must use a chemical herbicide, apply it only to very stubborn weeds and follow the package directions precisely. If your lawn has a serious weed problem, you can apply corn gluten to the lawn early in the spring to suppress weed seeds from germinating. However, this will also suppress the germination of your grass seed if applied in the same time frame. Wait 60 days after spreading corn gluten before topdressing and overseeding with grass seed.
Mowing – Mowing too often can stress out your lawn. Leave a height of 2.5-3 inches in spring and fall, and around 4 inches in summer. Wipe down your mower blades with an oily rag after every use to keep the blades sharp. Sharp mower blades are an easy way to prevent lawn damage and disease.
Lawn care is a big task, but as the saying goes, ‘an ounce of prevention is worth a pound of cure.’ Timed right, a little water and elbow grease can keep your lawn looking green, healthy, and beautiful.
Those of us with children are always looking for ways to spend time together while enriching their lives. However, finding an activity that engages both the interests of a child and their parent is easier said than done. Starting a kids garden project is one of those rare activities that every generation in the family can enjoy.
The benefits of gardening in early childhood can be felt throughout your child’s life. Kids can learn how plants develop, and what it means to nurture new life. Especially here in Steinbach, we know first-hand how valuable it is to understand how food is grown. These ideas are fun ways to spend time with your children while teaching them gardening fundamentals.
Garden Activities for Toddlers
Very young children are a ton of fun to involve in the garden. Get kids aged two to four excited about the garden ecosystem with these projects!
Egg Carton Seed Sprouter – Teach kids about seeding indoors!With your little one, bring a cardboard egg carton, a small bag of fresh compost-enriched soil, and a variety of seeds outside. Show your child how to fill them carton and let them have fun getting messy. Then, show them how to plant the seeds. They can pick different seeds to plant in each egg compartment. Water the carton and place it next to a sunny window with a plastic tray set underneath to catch runoff. Watch together as the sprouts begin to poke out and make a daily ritual of checking on the carton together.
Garden Buddies – While out walking together, have your toddler collect interesting shaped rocks. Take them home and use water-based paints to paint the rocks like frogs, insects, and flowers. Then. let your child decorate your yard or garden with their painted pals.
Taste Test – Help your toddler appreciate fruits and veggies early on by creating a sensory board of sliced fruit and vegetables. Ask them which colours they notice, which fruits and vegetables look similar, and whether they also taste similar. Try a variety of treats, like berries, cucumbers, carrots, apples, bananas, and small florets of broccoli.
What time of day should I water my plants? The best times to water your plants are in the early morning or in the early evening. At these times, the heat and sunlight aren’t at their peak, which gives your plants more time to absorb moisture before the sun begins to evaporate the water in the container. Well-hydrated plants are less likely to die prematurely, especially in the blazing Manitoba summer sun. You can help containers retain moisture by applying a layer of mulch over the soil—just make sure you leave a little room between the mulch and your plant stems.
Kids love to explore the natural world. Teaching children about gardening is easy and fun with these kids’ garden activities for ages five and up.
Plant a Kids Garden – Set aside a small plot, or a single container, in your outdoor space to act as your child’s very own garden. Show your child how to mix in compost with the soil and explain why it’s important. Once you’ve prepared the soil, take them with you to a garden centre (visit us if you’re in the Steinbach area!) and help them choose seeds that will grow quickly. Let them plant their garden and make it a part of your after-school routine to check on the garden. Show them how to check soil moisture with their fingers and water when the garden is dry.
Bean-in-a-Bag – For this fun activity, you’ll need a few dry kidney beans, a few sheets of paper towels, and a Ziploc sandwich bag. Show your child how to stuff the bag very loosely with paper towels. Get them to place one or two kidney beans in the bag and add enough water that the paper towels are damp but not sopping. Then seal the bags and hang them in front of a sunny window with a piece of tape. Your child will be able to see every day how much the bean sprout has developed. Once the bean has sprouted enough, you can re-plant it together into your garden or into a small pot.
Pet Earthworm – Teach your child about soil composition, and how to care for a very low-maintenance pet! With your child, use a set of measuring cups to layer sand and fresh soil in a large clear plastic container. Poke holes in the lid for ventilation and add enough water to dampen the soil. On the surface, add a few pieces of compostable waste, like coffee grounds, an old lettuce head, and a banana peel. Then, go hunting for earthworms together! Once your child has found one or two, place them in the container and keep the container on a sunroom, balcony, or in the backyard. Your child can look for the earthworms as they crawl around, watch how the compost breaks down, and keep them alive with more compost and water.
The Best Plants for Kids
Choosing plants for kids adds a few considerations to the selection process. Naturally, you’ll want to pick plants that are very easy to care for and that grow well in Steinbach soil conditions. It’s also important to consider what the child will find most rewarding about the plant.
Does it attract pollinators? Kids who love animals are fascinated by the bumblebees and butterflies that frequent pollinator plants!
Does it grow fast? Kids have much less patience than adults!
Is it edible? Growing something snackable might feel more rewarding to a young child.
Are the seeds easy to handle? Tiny seeds are difficult for tiny fingers to manipulate. Larger seeds are simpler to handle.
Does the plant have different textures? Kids are amazed by plants that grow in interesting shapes or feel interesting to the touch.
Is it a plant the child would recognize? It’s exciting for children when their tiny seed grows into something they recognize from real life or cartoons, like sunflowers or carrots.
Kids are naturally fascinated by the world around them, and the world of gardening lets them learn so much about it on a pint-sized scale. With a little encouragement and these fun activities, you might be raising a gardener for life.


 #1 Begonia I’Conia Lemon Berry
 #2 Petunia Crazytunia
 #3 Calibrachoa
 #4 Petunia Crazytunia
 #5 Supertunia
 #6 Begonia
 #7 Petunia Easywave
 Easter Lily
 Hydrangea
 Kalanchoe
 Primula
 Azalea

 2. Live Storage/Grow Indoors
 One of our favourite plants, begonias can be propagated using a method called vein cutting. To propagate your beloved begonias, try following these steps:
 It may seem like shrubs and trees would be too complicated to propagate, but they’re no different from any other plant and can be so satisfying to see something so small grow into a major focal point in your landscape. To propagate shrubs and trees, follow these steps:
 Clumping
 Spreading
 Woody
Woody Taproot
 Succulents
 Plants that Have Bulbs
 Houseplants with Petioles and Leaves Coming Off a Main Stem