Pruning is a fun and necessary gardening task but to most of us it can feel quite daunting. Don’t fret! Pick up those secateurs and let’s tackle this together!!
The main reasons we prune:
Improve health and vigour
Encourage fruit and flower production
Modify the shape or direct growth
Safety reasons
Bad reason to prune:
To control the size or height of a plant – if the tree is too tall, it shouldn’t have been planted in the first place!
The first step when preparing to prune a tree is to know the 4 D’s.
Dead
Diseased
Dying
Damaged
Always remove any of the above concerns on a tree or shrub. These cuts can be made at any time of the year. The four D’s, if left on the plant, are actually causing more damage and stress then if they were removed with a proper pruning cut.
Timing
The best time to prune most trees or shrubs is in the dormant (winter) season, before the plant has started to bud out. Trees that are dormant have an abundance of energy stored up. This allows them to repair any cuts made quickly when they come out of their dormant stage. They also spend lots of energy leafing out. This is why it is not recommended to do pruning in late Summer or Fall. If you remove too many of the leaves, the tree cannot produce enough food (energy) to repair itself. A tree can only do one thing at a time. This means it can grow, or repair itself from damage but not both at the same time.
How much to remove
A good rule is to never remove more than 20% of the tree. If you remove more than this, you will leave the tree without the means to produce enough food to repair itself or to prepare for its dormant season. Another good rule is any branch less than 2 inches in diameter is fine to remove. 2 inches to 4 inches should be carefully thought out before removing and if a branch is over 4 inches should only be removed for safety reasons. Trees will spend lots of energy to repair the pruning cuts. Remember, a tree can only do one thing at a time.
This is a good place to start when it comes to pruning. There is obviously much more to pruning depending on plant variety and proper pruning cut techniques. Oakridge Garden Centre has its own licensed arborist that can assist with any pruning concerns that may arise for you.
If you would like a free estimate on a pruning job, please contact us at 204-326-1015 to book.
When fall comes, we always end up asking how summer could have possibly passed by in such a blur. With cooler nights and the trees changing colours – not to mention back-to-school season already well underway – we can’t help but think about the long winter that we have ahead of us, nostalgically longing for when our gardens and yards were full of fresh, green life.
Fall Season, Spring Bulbs
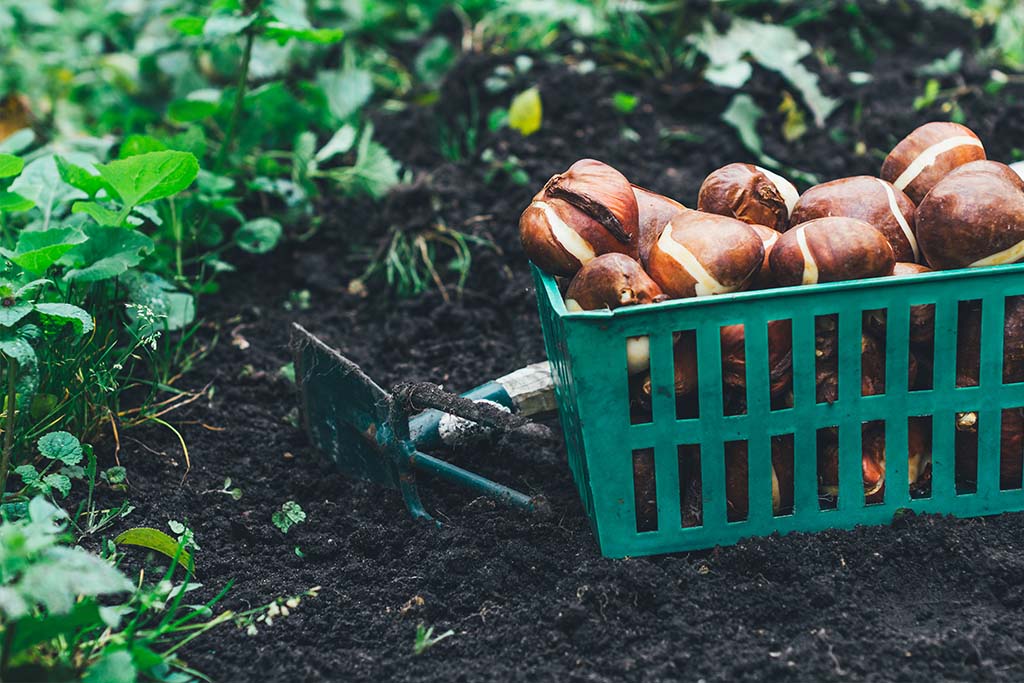
Fall is full of opportunity for the gardener that wants to get ahead and promise themselves something exciting for the spring. Planting now, in the fall, before the ground gets too frozen will set the bulbs in the soil to be chilled over the winter season. Later, as the weather warms these bulbs will
spring into action and welcome you into the growing season once more! They’ll be your first blooms of the season and they’ll greet you with bright and cheery colour without any extra work.
Getting Your Own Bulbs
We all love spring bulbs and there’s good reason that flowers like tulips, daffodils, and crocus are so popular. With fall planting, it’s easy to bring these beauties home to your own garden to enjoy this year. Here’s how:
Your Best Picks
Like most flowers, not every bloom or bulb is created equal. Some love the harsh weather of our northern climate and are ready to thrill at the first sign of temperatures above zero, while others are more dainty and might not cut it in our occasional deep-freeze winters.
The best choices for here in Manitoba are Tulips, Alliums, Crocus, Fritillaria, Scilla, and Snowdrops. These tough, little flowers are ready to take on our winters without compromising their gorgeous displays in the spring. Some more tender varieties of Daffodils can manage, too, but will benefit from extra mulching for better winter protection.
Planting Fall Bulbs
The only hard part of planting bulbs actually couldn’t be easier! The only things that prevent people from taking advantage of planting in the fall is that it calls for thinking ahead and some people are too intimidated to ask. Don’t let procrastination and intimidation get the best of you, it’s actually
one of the easiest garden habits you can practice.
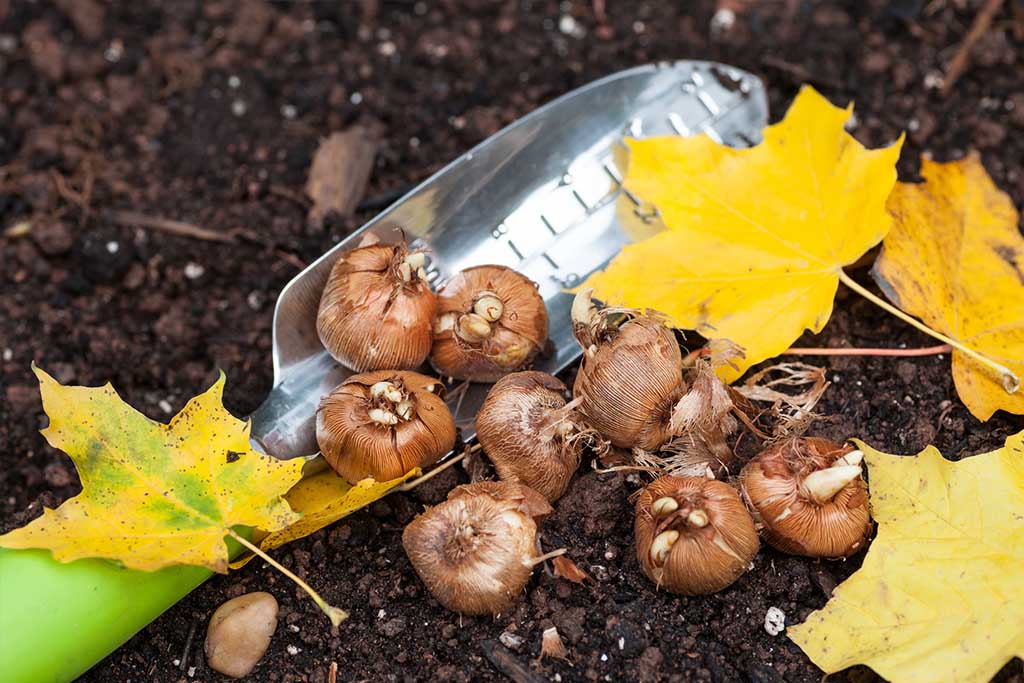
Find a sunny spot to plant. You won’t even need to fear the shady cover of your trees, as these early risers will be blooming long before leaves start emerging. You’ll want to plant in small groups – a single tulip is underwhelming, whereas a group of them is an impressive spot of cheer in your garden.
For tender bulbs, like tulips and daffodils, you’ll want to plant them a little deeper to protect them from the cold. Press your trowel 6-8” into the soil and pull it towards you to create a space. Simply drop the bulb in (pointy side up!), cover, and repeat.
For more hardy bulbs, a shallow hole will do. Just use the trowel to plant them 2-3” deep instead.
No matter the type of bulb, they can benefit from some bulb food to give them the best start they can. Throw in some bone meal or Myke for bulbs into each hole before the bulb as you plant.
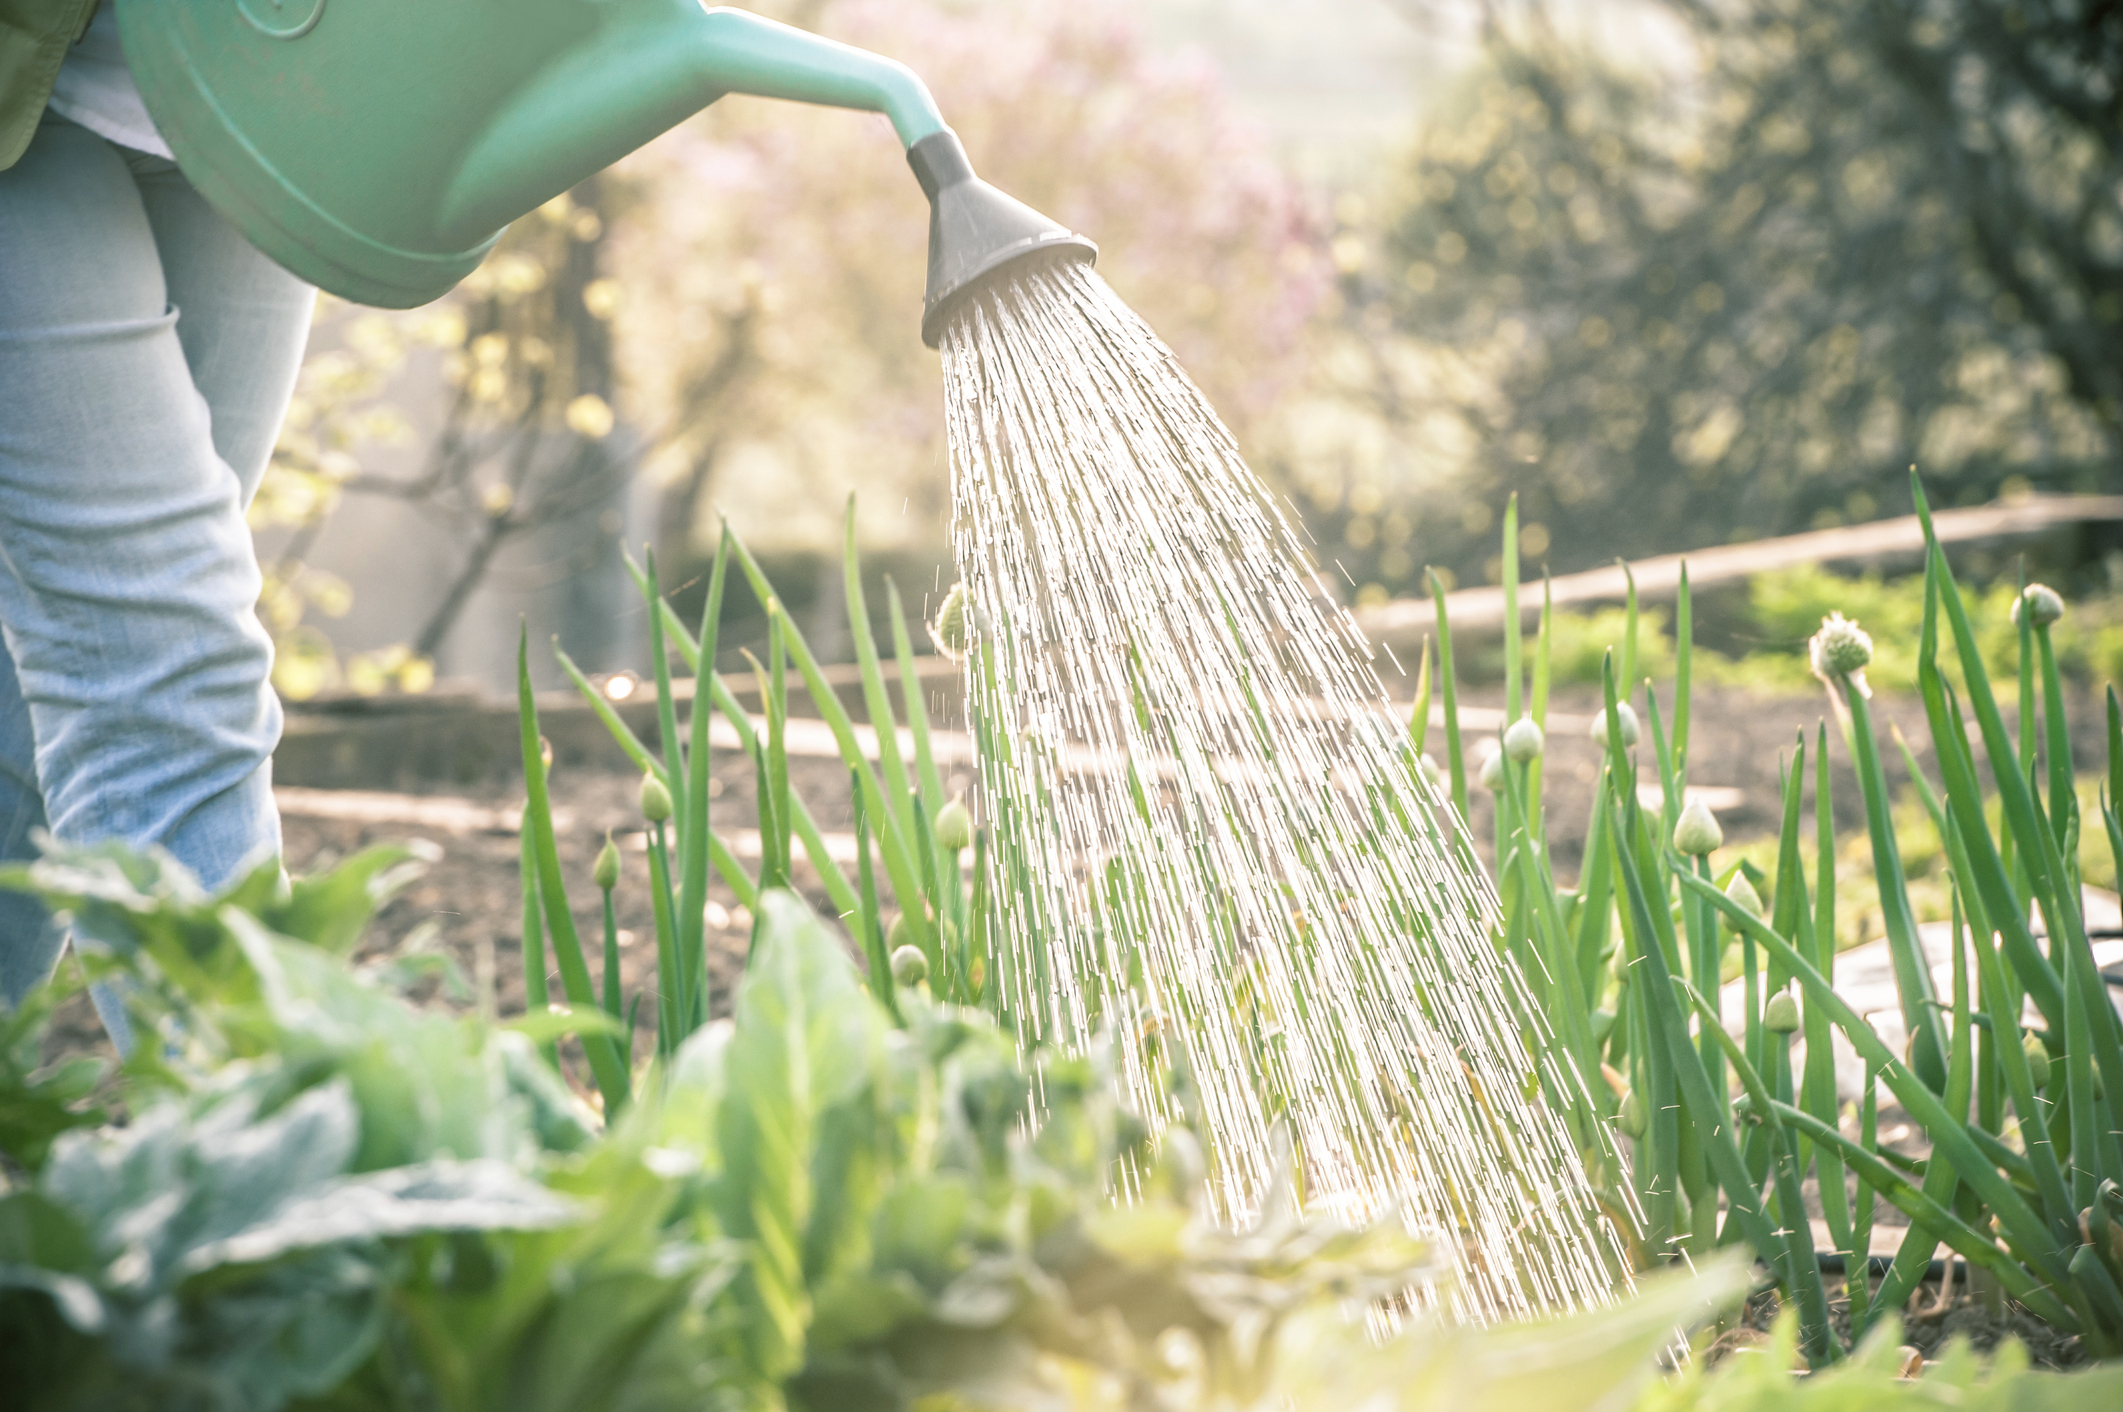
Don’t forget to water your bulbs well to give them the icy insulation they need in the winter.
After the blooms are spent, the leaves that remain can be a little disappointing until the rest of your garden catches up blooming. However, if you want your bulbs to reappear next year, resist cutting back foliage for about 2 months after the bulbs are spent. The plant will pull nutrients back to the bulb
to prepare for beauty sleep over the winter, getting ready for their biggest show yet next spring.
Many gardeners find bulbs intimidating because they aren’t the type of plant that we are used to working with in our gardens, but they are actually incredibly easy to plant and enjoy! Planting bulbs in the fall is super easy and has tons of options to choose from to get the perfect look in your garden. A bit of thinking ahead to warmer weather today will give you a worthwhile treat in the spring when we’re hungry for a little colour in our lives again.
Trees play an important role in our landscapes. Not only do they provide shade, beauty, and structure, they can also hold a great deal of sentimental value. From tire swings to treehouses, some of our most precious memories are centred around a beloved tree.
As our communities grow many newer homes tend to lack mature trees. Planting just one new tree makes a tangible, long-lasting difference for a community. Trees leave a legacy on a property that will often be there much longer than you will, and every year it’ll give a little more back. From its earliest days your new tree will produce oxygen, soon thereafter it will become a shelter for wildlife. Then, someday, it will be a landmark that will always remind someone of home.
The Best Time of Year to Plant a Tree
Planting when a tree is dormant in early spring has traditionally been known as the best time to plant a tree. However, if you’ve been wanting to plant a new tree, did you know that there’s no need to wait until next spring? Planting a potted tree can be done at any time of the year as long as you can get a shovel in the ground, spring, summer or fall.
Despite the common belief that spring is the only time to plant, summer can be a great time to give a tree a new home in your landscape with some very simple maintenance. When planting in the summer it’s important to water it thoroughly and regularly to keep the root ball moist. We recommend a generous drink every third day or so. You can also check with your finger to assess soil moisture levels and see if your watering schedule needs adjustment.
Planting a New Tree
Choose a location for your tree that will look attractive and suit the environment the tree is adapted to. For instance, if the tree prefers a wetter environment, a lower area in the landscape will collect more water during rainfall.
Before you plant your tree, make sure you’ve got some black earth on hand to backfill the space between the tree’s root ball and the surrounding ground. Fresh black soil has air pockets that will allow new roots to pass through easily as the tree establishes, whereas compacted old soil may be tougher for the new roots to penetrate. Allow several inches of space around the root ball. The tree’s label will tell you how much space is recommended.
The hole itself should be about the same depth as the root ball so the tree can be planted level with the ground. Ensure that any circling roots are pulled away from the root ball. This will ensure that root girdling won’t happen. After planting, water the tree well and lay down a layer of mulch to conserve moisture and prevent weeds from sprouting in the fresh soil.
Your New Tree’s First Year
During your tree’s first spring and summer, water it well every 10-14 days if needed to help it establish. Continue watering until the ground begins to freeze in the late fall. Freshly planted trees are much more vulnerable than established trees, so be very careful not to run over the root ball or bump the trunk with a lawn mower or weed whacker. Mulch the tree within about a foot and a half radius of the trunk to prevent the need for lawn tools near the planting site— just be sure not to pile too much mulch around the base as this could lead to rotting.
If you’re concerned about your new tree surviving its first Manitoba winter you can consider wrapping the tree. We also carry materials to help guard your tree against rodents and deer. Our staff can help you choose the right items for your tree species.
A new tree is a significant investment in your landscape — one that you’ll grow to love more and more each year. As your tree matures and grows, it will begin to shape the way you and others see your property. With the right start, your new tree will be on its way to enjoying a long and healthy life.
Pierre is not only one of the owners of Oakridge, but he is also our expert in all things tree and shrub related. On any given day in the spring, summer and fall, you’ll find him in the landscape yard tending to every tree and shrub we have. For Pierre, these plants don’t just add visual appeal to your landscape, they create impact that continues to grow year after year, season after season.
We were able to pull Pierre away from the growing array of new trees and shrubs arriving to our lot this spring and ask him what his tried-and-true landscape selections are. From beautiful bloomers to stately evergreens, this list has some amazing choices. Want some help picking the perfect tree or shrub for your landscape? Be sure to ask for Pierre when you come in for a visit at Oakridge. He can make sure you choose the best plant to suit your needs, and your landscape.
Annabelle Hydrangea – The Consistent Bloomer
For Pierre, this Hydrangea is a popular choice to add a floral accent to your landscape and for very good reason. A very consistent bloomer, it’s large white blooms have a romantic mounding habit and cascading appearance that add a touch of show.
Diablo Ninebark – The Bullet-Proof Shrub
Pierre affectionately refers to the Diablo Ninebark as the bullet-proof shrub. If you are looking for a quick-grower to provide screening/privacy, this aggressive growing plant is perfect for you! Just keep in mind you’re the boss of this shrub! Prune it to the shape and size that you need to keep it looking its best.
Black Hills Spruce – The Landscape Staple
Pierre loves this landscape staple. A native tree to Manitoba, it’s hardy and well-adjusted to our soil conditions. Bushy and full, yet slightly smaller overall than the Colorado Spruce, it adds a great touch of evergreen to any landscape.
Double Play Spirea – The Double Bloomer
The Double Play Spirea shines through with bright reds and golds, blooming early and then again in later summer. Pierre finds this whole series of Spirea holds its colour very well through the summer and is outstanding when it first leafs out in spring.
Dwarf Korean Lilac – The Petite Beauty
What is not to love about this lilac? The leaves are shiny and curly, and it’s consistently covered in blooms – starting mid- to late-June. The best part? It needs very little pruning to maintain its impressive round shape.
Autumn Blaze Maple – The Firebrand
The Autumn Blaze Maple is a large shade tree that puts on a show every fall when its foliage turns from bright green to an intense fiery red. With this tree you’ll want to ensure its planted in a dry area – no Maple likes standing water at its feet.
Little Giant Cedar – The Goldilocks of Cedars
For Pierre the Little Giant Cedar is not too big, and not too small, but just the right size as a foundation plant or as an accent in a shrub bed. With its globe shape and rich green foliage it can be the perfect addition to your landscape.
Hot Wings Maple – The Compact Stunner
This compact tree is perfect for small spaces and adds a pop of colour starting in July when bright red samara (helicopter-like seeds) start making their appearance. Come fall, the Hot Wings Maple will add a stunning orange-red colour to your landscape.
Lemony Lace Elder – The Airy Accent
The Lemony Lace Elder has a fantastic fine cut leaf texture with bright gold foliage that shines all season long. Its airy texture makes it a great accent against heavier-leafed plants like the Diablo Ninebark.
Hydrangea Quick Fire Fab – The Newbie
The new kid on the block, Pierre is very excited about this new plant! Super early to bloom and more compact than the regular Quick Fire this Hydrangea has conical blooms that go from white to pink to red from the bottom up as the season progresses making it a wonderful feature plant or accent.
Planting in containers is a fabulous and versatile way to garden. It is also an excellent method for learning the basics of plant care if you’re new to gardening. Adding pretty pots, baskets, and other containers to your landscape is a wonderful way to add colour, texture, and variety to your outdoor space and can be changed up year-after-year. While caring for your containers is relatively easy, we have some tips and things to avoid to make sure your containers look bright and healthy all summer long!
Container Gardening Tips
Choose the Right Soil
We highly recommend a combination of sea soil and a soil-less potting mix. The sea soil holds moisture and nutrients well, and the soil-less potting mix allows for good drainage with enough aeration so the little roots can grow strong.
Pick Healthy Plants
Wherever you choose your plants from, make a point of checking them to make sure they have been watered well. This means they’ll have sturdy stems and bright green foliage.
Light Levels
Consider how much sun your pot will receive. If you watch where you plan on placing your pot for a few days, you should be able see how many hours of direct sunlight it will receive. If its 1-3 hours, it is considered full shade. 3-5 hours, it is considered part shade/part sun. 6 or more hours and it is considered full sun.
Plant Placement
Thriller: The tallest and/or most impressive plant should be placed at the back of your pot if it is against a wall or planted in the centre if you can see the pot all the way around.
Filler: These plants are spaced in and around the thriller plant. These are the plants that you choose for bushiness or for colour and contrast.
Spiller: Anything that trails should be planted on the edge of your container allowing it to spill over.
Water & Fertilize
After initial planting, water thoroughly so your container soil is wet right through to the bottom. During periods of hot and windy days, water daily, especially if your pot is in the sun. Remember that shade plants don’t require as much water as sun plants do. Be sure to fertilize regularly. You expect a lot of colour and wow factor out of your container plants so we need to supply them with the nutrients that they will need to fulfill that potential!
Deadhead Your Plants
Many plants require deadheading to keep them blooming all summer long. Take the time to remove faded or dried-up blooms and you will have beautiful pots all through the season.
What to Avoid
Using Soil from Your Garden
Soil from your garden often has too much clay in it, compacting the soil and making it hard/dense after rain and hot sun. This doesn’t allow for proper root growth.
Too Large or Too Small Plants
Make careful choices to ensure you are not overcrowding, but creating a nice, full container. Check with our wonderful staff or read the tags carefully as you choose your plants.
No Variety
Choose plants that will complement each other well, not just in terms of colour, but also in size. Avoid choosing plants that are all the same texture or have the same size leaves or flowers. It’s more attractive and appealing to the eye to have a variety of sizes of plant leaves and blooms in your pot.
Letting Your Pot Dry Out Completely
Avoid letting your pot dry out completely. If your pot gets too dry, some plants may not be able to be resuscitated. Stay on top of your watering!
Tania is our long-time vegetable grower and one of her favourite things to grow and eat are peppers! Peppers are such a versatile fruit; they can provide amazing flavour and spice or can be the star of a dish all on their own.
Peppers are also so much fun to grow with their vivid colours, unique shapes, and varying flavours and heat. In fact, did you know that if we have a hot, dry summer like we have in recent years your peppers can be up to 10 times hotter as when we have a cool, rainy summer?
From hot to sweet, Tania grows a wide variety of peppers, and these are her must-haves she grows in her garden year after year.
Cayenne Pepper – Red Embers
Scoville Scale – 30,000 to 50,000 SHU This tasty, large cayenne pepper is packed with flavour. Along with a very high yield, this plant produces early making it great for our shorter growing season. The peppers can be eaten raw but are excellent to use as a shaker spice once it has been dried.
Drying Tip! If you don’t have a dehydrator, another option to dry your cayenne peppers is to put them in your oven at 150 degrees with the oven door slightly ajar, checking every 30 minutes or so and rotating them as needed. After about 1-2 hours they should be dried enough that you will be able to put through your food processor or blender.
Poblano Pepper – Trident
Scoville Scale – 250 to 1,500 SHU
These extra-large poblano peppers are great as a stuffing pepper, for making homemade green salsa, or as an addition to almost any Mexican food. With their mild heat, they’re also delicious roasted with just a bit of olive oil and sea salt.
Jalapeno Pepper – Jalafuego
Scoville Scale – 4,000-6,000 SHU
Another high-yielding plant, the Jalafuego Jalapeno Pepper is the best for adding a kick to any salsa. These dark green peppers are also delicious as a jalapeno popper or an armadillo egg. If you’ve never had an armadillo egg, check out Tania’s recipe below and give them a try!
Tania’s Armadillo Egg Recipe 1. Slice the pepper in half, remove seeds and stuff with a mixture of cream cheese and cheddar cheese.
2. Mix your usual hamburger patty mixture and form around the stuffed pepper.
3. Wrap with bacon and bake at 375 degrees or BBQ till done.
Bell Pepper – Lunch Box – Red, Yellow and Orange
Scoville Scale – 0 SHU
With their cute size, sweet flavour, crunchy walls, and amazing colour, kids (and those of us who are kids at heart) will love these little peppers as a snacker, in fact you may find they disappear right off the plant! A high-yielding plant, it produces peppers that are 2-3” long with a deliciously sweet flavour that is great raw or cooked.
Chili Pepper – Anaheim
Scoville Scale – 500 to 2,500 SHU
A relatively mild, Californian chili pepper, the Anaheim can be eaten when green or allowed to ripen to a deep red giving them a slightly sweeter taste. With their thick walls and mild flavour, these peppers are great for stuffing or roasting.
Winter Storing Tip! Once matured to red, string the peppers together using twine or thread and hang them in a dry location. After several weeks the peppers will have dried out and you’ll have delicious garden chili peppers to use in your dishes all winter long.
A favourite task for us in the Greenhouse is getting to explore the new plants that have been developed each season. With new colour options and hybrids, some of our all-time favourite annuals are those that have been created in just the last few years.
Before we consider adding a new plant to our Greenhouse, we take special care to ensure they will not only add visual appeal, but also be a strong and healthy addition to our gardens. New plants are exciting, however, they may not always be perfect. Sometimes what can look promising in a trial garden doesn’t translate well into a home garden. We take this into careful consideration when we choose our new favourites for the season so you know you’re getting the best and brightest of the new arrivals.
We’ve scouted out our favourite new plants for 2022 and we’re excited to introduce them to you!
#1 Begonia I’Conia Lemon Berry
Part-Full Shade | Trailing | Basket/Container
This shade loving plant offers large striking blooms with soft yellow centres and shades of pink on the outer petals. Complimented by deep green foliage the Begonia I’Conia Lemon Berry is sure to make a statement in any basket or container.
#2 Petunia Crazytunia
Black and White
Part-Full Sun | Mounding | Basket/Container
With crisp white petals and vivid black centres these Petunias are an absolute knockout.
#3 Calibrachoa
Rainbow Calypso Coral
Full Sun | Mounding/Trailing | Basket/Container
A vibrant addition to the Calibrachoa family, this mounding/trailing plant features small but plentiful blooms of varying shades of orange.
#4 Petunia Crazytunia
Mayan Sunset
Part-Full Sun | Mounding | Containers/Flowerbeds/Borders
Another unique addition to the petunia family, the Crazytunia Mayan Sunset features abundant blooms with yellow centres that blend out into varying shades of orange, pink and coral.
#5 Supertunia
Vista Jazzberry
Part Sun | Mounding | Containers/Flowerbeds
This Supertunia is a showstopper. A large, mounding and spreading plant, it features loads of colourful blooms that just don’t quit whether you use them in a container or flowerbed.
#6 Begonia
Fiona Rose
Part-Full Shade | Trailing | Basket/Containers
Semi-double flowers in a beautiful pink are framed by glossy green leaves provides an elegant touch to any container.
#7 Petunia Easywave
Lavender SkyBlue
Part-Full Sun | Mounding | Basket/Container
If you love purple then look no further than these new blooms. With their mounding habit they are a gorgeous addition to your hanging baskets or containers.
Did you know that your flowering indoor plants can transition to your favourite outdoor spaces, including your sunroom or porch?
We love using spring florals to add a splash of colour to our homes as we wait for our gardens to begin blooming. Not only does it breathe new life to our outdoor spaces, but it also does the same for your plant, giving it fresh outdoor air in which to thrive. Natural floral accents are also a great way to add a special touch to your Easter décor, from the classic Easter Lily to the elegant Azalea, there are so many plants that can be used to enhance your outdoor space.
So, if like us you can’t wait to see your favourite spring flowers gracing your porch or sunroom, we’ve put together our top tips for making sure your plants flourish as you transition them outdoors.
General Care when Transitioning Your Plant Outdoors
Transitioning your flowering indoor plant outdoors involves just a few simple steps to ensure it maintains its beauty and health.
Pick the Right Pot
Be sure your plant is in a pot that drains well and has good quality potting soil. If your plant came in a container that has a decorative wrap on it, it will be best to remove to ensure it can adequately drain.
Acclimate Your Plant to the Outdoors
It’s helpful to allow your plant to adjust to its new outdoor home by putting it outside for a few hours at a time to start, leaving it for longer periods until it’s hardened off. This will allow it to adjust to the change in temperatures, light and wind.
Pay Attention to the Weather
Your plant has grown accustomed to being in a climate-controlled environment. Be sure to keep an eye on the weather and if temperatures are going to dip below 10-12˚C bring them inside. Lower temperatures could set them back and it may take a while for the plant to recover.
Let there be Light (but not too much!)
Your plant will more than likely been receiving indirect light in your home, so be careful not to place it in direct sunlight. Choose a spot that provides partial sunlight. If your chosen location gets morning sun and shade during the afternoon, even better!
Don’t Forget to Feed & Water
Because your plant will be more susceptible to environmental conditions, it will likely need more watering and fertilizer to thrive. Be sure to keep an eye on the soil condition and adjust your watering schedule if needed.
Encourage New Growth
Keep your plant looking fresh and encourage new growth by deadheading.
Our Favourite Indoor Flowering Plants that Transition Well Outdoors
We have plants we love using outdoors during the spring months. From the Easter Lily, to the Kalanchoe, these plants transition well outdoors and add that fresh spring flare all of us green thumbs crave as we anticipate another growing season!
Easter Lily
The Easter Lily exudes grace and elegance with its large white trumped shaped flower. A symbol of life, purity, innocence, joy and peace, the Easter Lily has long been a primary symbol for this sacred season. White Lilies are mentioned frequently throughout the bible and are the most popular flower chosen to grace homes and churches each spring as a symbol of the resurrection and new life.
Hydrangea
A spring favourite, the Hydrangeas boasts small flowers that come together to create large domes of blooms. Coming in lovely soft colours like pink, purple or blue, they add the perfect accent to any Easter or spring-themed décor.
Kalanchoe
While you may think a succulent would be too tender to put outdoors in Manitoba, the Kalanchoe is small, but mighty. A striking plant with deep green leaves and clusters of tiny flowers that can be pink, yellow, orange, red or white, the Kalanchoe will brighten any outdoor space with its colourful blooms.
Primula
If we could choose only one word to describe the Primula, it would be vibrant. This spring-blooming member of the Primrose family is most often found in white, yellow, orange, red and pink each featuring a vibrant yellow eye that give these plants a unique and colourful look that is unstoppable.
Azalea
The Azalea is one of the most elegant plants around with bright coloured flowers and foliage that screams spring.While Azaleas are most commonly seen in shades of pink and purple, they can also be found in red, orange and yellow.
Cyclamen
Another member of the Primrose family, the Cyclamen has stunning green foliage that is topped by tall, graceful flowers. These beauties are commonly seen in red, pink, white and purple.
Because we all know you can never have enough plants! Propagating is an inexpensive and fun way to expand your plant collection and even share it with others. From indoor tropicals, to beautiful annuals, perennials, trees and shrubs, there are a variety of methods to creating your very own plant babies!
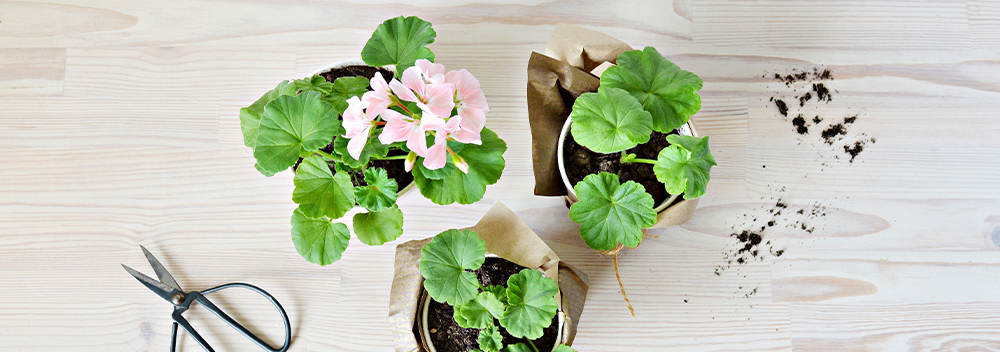
Geraniums
There are two ways to propagate geraniums:
1. Dry Store Over Winter
It may seem almost too easy, but dry storing your geraniums over the winter is a fabulous way to propagate these garden favourites. Before the first frost, dig out any healthy geranium plants you would like to store, then follow these easy steps:
Tidy your plant roots by shaking off any excess soil, they don’t need to be perfectly clean, just enough to avoid making a mess and prevent rotting.
Lay them in a shaded area to dry.
Once dry, place in a cardboard box or paper bag with a closed top and store in a cool, dry place.
Check on the plants occasionally to ensure you don’t notice any signs of mould or extreme dryness. Both of these can be managed by either trimming off areas with mould, or soaking the plant briefly in water to rehydrate.
Once you’re ready to prep for planting, trim back the geranium to the healthy green growth.
Fill a container with dampened soil and place the stem deep enough to cover two leaf nodes.
It takes about 7-14 days to start seeing new growth, and if you water thoroughly, in about 4-6 weeks the plant should be ready for its move to your garden.
2. Live Storage/Grow Indoors
Geraniums are a beautiful plant and provide such a wonderful summery scent so you may want to have your plant indoors for the winter to enjoy it year-round. Geraniums need the following to stay healthy indoors during the winter months, including:
4- 6 hours of sunlight per day.
A well-draining plant pot.
Quality potting soil that provides adequate drainage to avoid root rot.
Once spring arrives, follow these easy steps to make cuttings for your brand new geranium babies:
Using a sharp, clean tool make 4-6 inch cuttings, removing lower leaves, leaving few sets of leaves at the top.
In a small pot or tray, place the cuttings with the bottom half buried in a dampened rooting medium. Be sure the medium is a well-draining blend (we suggest one that includes peat moss, perlite or vermiculite).
Place the cutting in a warm location with bright, indirect sunlight, watering only when the soil feels dry.
Roots should establish in approximately 3-4 weeks and once formed will be ready to pot in preparation for transplanting in your garden.
Begonias
One of our favourite plants, begonias can be propagated using a method called vein cutting. To propagate your beloved begonias, try following these steps:
Cut a healthy leaf that has a prominent vein from your plant right at the base.
Trim the stalk off so you’re left with just the leaf.
Make cuts on the underside of the leaf’s main vein and place or pin the leaf, vein-side down so it makes firm contact with your rooting medium (we suggest vermiculite as it will provide the best balance of moisture and oxygen for your developing plants).
Place your container in an area where you can provide adequate humidity and light. You can cover with a dome or a plastic to keep moisture in, and it is helpful to mist regularly, watering as needed.
With sufficient warmth and moisture, your begonia babies will start to emerge from the cuts in the vein after about 6 weeks.
Once the new growth has reached approximately 3” in height and have a few leaves they’re ready to transplant into small pots to further establish their roots in preparation for replanting in a larger pot or into your garden come spring!
Fun fact! You can propagate certain houseplants using the vein cutting method as well, including African Violets.
Shrub & Trees
It may seem like shrubs and trees would be too complicated to propagate, but they’re no different from any other plant and can be so satisfying to see something so small grow into a major focal point in your landscape. To propagate shrubs and trees, follow these steps:
Take cuttings from your existing plant using a sharp tool, preferably in late May through early July from the new season’s growth. We recommend using a cutting that has some flexibility but that will break if bent.
Remove any flowers from your cuttings and make a fresh cut below where one or two leaves are attached to the stem.
Dip the freshly cut ends into a root hormone. We love Evolve I-Root #1 Rooting Gel, but any quality root hormone will help promote new growth in your cuttings.
Choose both a rooting medium and container that provide good drainage.
Fill your container with rooting medium and water, allowing it to drain for a few minutes.
Insert cuttings approximately 2” deep and place in bright, indirect light. You can cover with a dome or plastic to help maintain moisture. You’ll want to keep the soil moist as the cutting begins to develop new growth.
Your new tree or shrub growth should make its first appearance around 6-8 weeks. Once there is a well-established root system, carefully transplant cuttings into individual pots.
After a few additional weeks your tree or shrub baby should be ready for you to prepare it for its move outdoors.
Perennials
Perennials can be propagated in several ways and are a popular choice for gardeners to expand their gardens and share the beauty of their plants with others. To get started, you’ll want to choose your healthiest plants for dividing to ensure they flourish in their new home. Plants that flower in the fall are ideally divided in spring, and those that flower in spring divided in early fall. How you propagate your perennials depends on the type of plant you want to divide, for example:
Clumping
A clumping perennial, such as day lilies, rudbeckia or hostas can be easily divided by digging up the entire plant and finding a natural point in which to separate into new plants. You may need to cut apart a few roots if the clump is tightly packed but choosing a spot where there is the least resistance to cutting is the way to go. Any portion you divide should have green above ground and roots below.
Spreading
Spreading perennials, such as phlox, clematis and coneflower don’t clump together but rather grow in groupings of individual plants.
For spreading perennials, you can simply dig up any portion you want to move, leaving the main plant untouched.
Woody
Woody perennials, such as lavender and rosemary feature one main stem but can spread when the stem touches the ground and takes root. Sometimes this may happen naturally, or you can layer the stem in soil to create an opportunity for new roots to develop. If roots develop, you can then cut and dig up the new stem without having to touch the main plant.
Taproot
Taproot perennials, such as oriental poppies, lupine and butterfly weed have one main root. To divide it takes a bit more bravery than simply separating roots. With taproot perennials, you will dig up the plant and cut so that each portion has a piece of the taproot along with some growth buds.
Once you have your new perennial babies divided, it is time to replant! Dig a hole that is slightly wider than the roots and at approximately the same depth as the original plant. Fill in with soil and fertilizer and pat down, watering thoroughly once planted. Continue to water often for the first month to promote root development and watch your new plant flourish.
House Plants
Succulents
Propagating succulents is an easy way to continue to grow your tropical collection or share your favourite plants (they can also make a fabulous gift!). To begin, cut a few healthy leaves from the base of your plant being careful to remove the entire leaf in one, undamaged piece. From there:
Place your cuttings in an area with bright, indirect sunlight and leave for approximately four days to allow the ends to callus over.
After the leaf has calloused over, take your container and fill with a rooting medium that provides excellent drainage.
Water soil and place cutting on top.
It is important to keep your cuttings moist and warm, misting regularly can help to let those babies grow!
After 3-4 weeks new sprouts should emerge and after 7 weeks small leaves and roots should begin to form.
After 7 weeks you should have new growth large enough to separate from the cutting and plant it its own pot which can be cared for like the original succulent plant.
Plants that Have Bulbs
Houseplants with bulbs are another popular plant to propagate. Think of plants like the asparagus fern and ZZ plant. This is not only a great way to expand your indoor garden but can also help to maintain the health of your plant by avoiding overgrowth and crowding in your pots. The first step in propagating these plants is to carefully remove it from its pot, from there:
Gently shake off any excess soil from the roots.
Examine your plant, looking for its bulb offshoots to divide in sections ensuring that all sections have sufficient roots to grow in their new home.
Return the original plant into its pot, replacing any soil as needed.
Plant the new bulb groupings in a pot filled with a quality potting mix about as deep as it was in your original plant.
Continue to care for the plant as you did before.
Houseplants with Petioles and Leaves Coming Off a Main Stem
Have houseplants with petioles and leaves that come off the main stem? Petioles are the stalk of the leaf that attaches to the main plant stem. We’re talking fiddle leaf figs, schefflera and African violets. If so, then you can use this method to propagate your plant:
Cut your chosen leaf petioles at the base, trimming so they are approximately 3-4 inches in length. You’ll want to choose cuttings from more mature sections of your plant to get the best roots.
Dip your petiole in a rooting hormone and then nestle into your chosen rooting medium ensuring the leaf isn’t in contact with the soil.
Water, allowing to drain for a few minutes before covering with a plastic bag or dome to maintain moisture. When choosing your rooting medium look for options such as vermiculite and perlite that won’t pack down and retain too much moisture.
Place in a warm area with bright, indirect light until new growth develops, typically in about 6-8 weeks.
Once the leaves of new plants have begun to develop, carefully separate them and pot into their own containers using a quality potting mix.
Plants are our passion and we love helping people get their gardens, indoors and outdoors, growing. If you have additional questions about propagating your plants, get in touch, we’d love to hear from you!
Manitoba is beginning to look a lot like Christmas! With snow on the ground and joy in our hearts, we’re all looking forward to that most magical time of year. Now that we’re well into November, it’s time for one of the best parts about the holidays—the decorating!
Holiday decor is essential for creating the festive ambience that defines the season. We love how each year brings new trends, along with the reinvention of old traditions. No matter what your taste, make sure to add these decorating projects to your holiday prep checklist!
Outdoor Decor
In Steinbach, we’re lucky to live in a bonafide winter wonderland at this time of year! While Mother Nature is happy to do some of the decorating for you, you can add some extra sparkle with these gorgeous pieces of outdoor holiday decor.
Porch Pots: Here at Oakridge, we love our porch pots! If you’ve never had them before, holiday porch pots take the place of container gardens in the winter. We love to craft them with fresh evergreen boughs, showy ribbons, birch or dogwood branches, holly berries, and ornaments, like angels and jingle bells. If you make your own porch pot, you can customize them to the theme of your choosing. If you don’t have the “craft bug”, though, you can simply visit our garden centre 1 mile west of Steinbach. We carry beautiful, pre-crafted porch pots handmade by our in-house designers.
LED Lights: It’s no secret that string lights are a classic holiday decorations, and LEDs are the best value for your money. Unlike traditional incandescents, LED string lights last for years without needing to be replaced. They also give off no heat, which makes them safer for your decorating your home, trees, and shrubs.
Your lights will look beautiful whether you only choose to trim the edges of your roof, or if you shroud your entire yard with twinkling lights. However, if we can offer one piece of advice, your display will look best if all the lights are the same colours. For instance, if you go with multi-coloured lights on your roof, opt for the same colours in your shrubs. We also recommend incorporating at least some white lights into your display, as they shine brightest and help bring out the other colours you’ve chosen.
Wreaths: After November 12th, wreaths are a must-have item for every door! We love to coordinate the theme of our wreath with the colour scheme of the rest of our outdoor decor. Depending on whether you want to re-use your wreath, you can craft them from lifelike or living evergreen. If you’re a purist and love the smell of the real thing, we carry a selection of beautiful handmade wreaths at our garden centre.
Window Dressing: For those who really love to get in the spirit, a little window dressing can tie the whole look together. Try adding a garland of fresh evergreen and holly berries to your window boxes or use hot glue to attach suction cups to mini-wreaths or holiday bows and affix them to your window panes.
Indoor Decor
After a long day, who doesn’t love being greeted with a home filled with the sights and scents of the holidays? Set the scene with these festive adornments for the home.
Mini-Trees: This year, we’re seeing a trend of incorporating multiple small trees, like dwarf spruces, throughout your home to compliment the family Christmas tree. There are so many adorable ways to make this trend work for you. Try matching the colour scheme of all the trees for a cohesive look or let everyone in the family decorate a personal mini-tree before decorating the family tree together.
Poinsettias: Everyone’s favourite holiday houseplant that never goes out of style, poinsettias can be worked into your table decor, placed on your mantel, or kept in the bathroom for a burst of seasonal life. Don’t forget that there are many colours of poinsettias, not just the classic scarlet red! Try a pretty ivory variety or a two-toned plant in peppermint shades of red and white.
Home Fragrance: We’re of the opinion that fragrance completes any indoor space, and during the holidays, the very best ones are in-season! At Oakridge, we carry a range of handmade candles, as well as a line of diffusers to gently release your favourite aromas into the air. Try spicy blends with notes of cinnamon, clove, or apple to give your home the smell of fresh holiday baking. Or, if you prefer fresher scents, give your home that Christmas tree scent with the fragrance of balsam fir.
Plush Textiles: Around this time of year, everyone in Manitoba is happy to stay bundled up all day and all night. Embrace the concept of hygge, a Danish word that roughly translates to “a mood of coziness”, by filling your living spaces with soft and comfy fabrics. Cable knit and faux-fur are both very popular for 2019. Try incorporating them with throw pillows, blankets, chair covers, and even your Christmas tree skirt.
Easy & Beautiful Centrepieces: We all look forward to Christmas dinner for the chance to connect and be merry with the whole family. A beautiful table sets the mood for a joyful night, and it doesn’t have to be difficult to achieve! You can beautify your tablescape with cuttings of fresh greenery, like pine or eucalyptus, paired with a row of evenly-space white votive candles. If you like, you can even add extra magic with a string of delicate fairy lights.
With these simple and elegant additions, your home will be ready for Christmas from the inside out. But don’t forget to tick the final box on the checklist—taking some time for yourself. Make sure to give yourself the gift of time to curl up with a hot drink and enjoy your beautiful surroundings. After all, to truly enjoy the holidays, you have to take one!


 Annabelle Hydrangea – The Consistent Bloomer
 Diablo Ninebark – The Bullet-Proof Shrub
 Black Hills Spruce – The Landscape Staple
 Double Play Spirea – The Double Bloomer
 Dwarf Korean Lilac – The Petite Beauty
 Autumn Blaze Maple – The Firebrand
 Little Giant Cedar – The Goldilocks of Cedars
 Hot Wings Maple – The Compact Stunner
 Lemony Lace Elder – The Airy Accent
 Hydrangea Quick Fire Fab – The Newbie
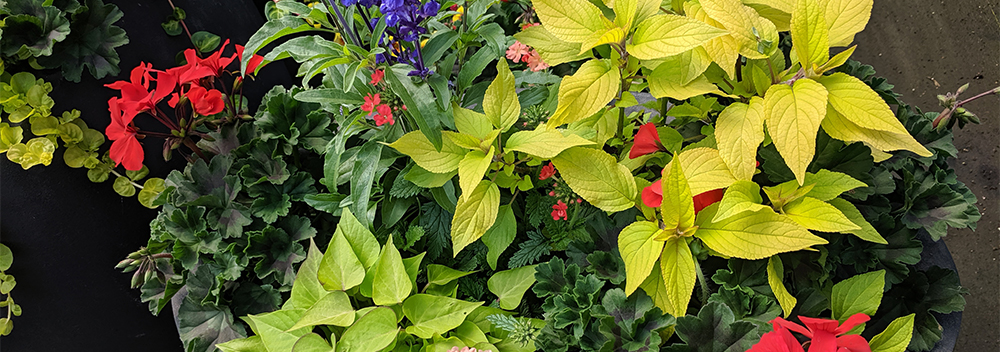

 What to Avoid
 Cayenne Pepper – Red Embers
 Poblano Pepper – Trident
 Jalapeno Pepper – Jalafuego
 Bell Pepper – Lunch Box – Red, Yellow and Orange
 Chili Pepper – Anaheim
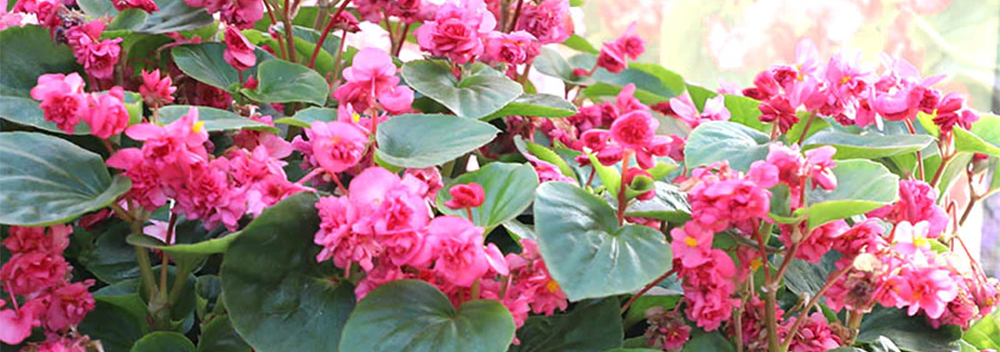
 #1 Begonia I’Conia Lemon Berry
 #2 Petunia Crazytunia
 #3 Calibrachoa
 #4 Petunia Crazytunia
 #5 Supertunia
 #6 Begonia
 #7 Petunia Easywave
 Easter Lily
 Hydrangea
 Kalanchoe
 Primula
 Azalea

 2. Live Storage/Grow Indoors
 One of our favourite plants, begonias can be propagated using a method called vein cutting. To propagate your beloved begonias, try following these steps:
 It may seem like shrubs and trees would be too complicated to propagate, but they’re no different from any other plant and can be so satisfying to see something so small grow into a major focal point in your landscape. To propagate shrubs and trees, follow these steps:
 Clumping
 Spreading
 Woody
Woody Taproot
 Succulents
 Plants that Have Bulbs
 Houseplants with Petioles and Leaves Coming Off a Main Stem